With the Step Elements entered, it’s time to create the actual Flow. Open the QLI Approval Process Flow.
Click on the Resources Tab in the left section and double click on SObject Variable. Enter sovQLI as the Unique Name, the Input/Output Type as Input and Output, and the Object Type as QuoteLineItem.

Click OK. Click on Resources again and then double click on Formula. For the Unique Name, enter fDiscount, Value Data Type as Number, Scale as 2, and the Formula should be, “{!sovQLI.UnitPrice}/{!sovQLI.List_Price__c}”.

Click OK.
You might be wondering, I see a {!sovQLI.ListPrice}. Although this is true, since you are looking at the Quote Line Item before it is created, the {!sovQLI.ListPrice} hasn’t been entered yet. It is also a field that is part of the Product.ListPrice, so it doesn’t translate very well with Flows. Since you created the List_Price field earlier and assigned the List Price of the Price Book Entry, this does two things for you. First (and most importantly), you can use the List_Price field in this Flow. Second, it saves the history of the List Price, so if the List Price changes in the future, you’ll know what the List Price of the Quote Line Item was at the time of creation.
The formula that you just created gives you the Discount of the Quote Line Item, so now it’s time to delete the sQLIDiscount Step element as you created the formula. Click on the sQLIDiscount Step Element and click Delete/Backspace.
From the Palette, click on the Decision Element and drag it to the left of the sDiscountDecision Step Element. For the Name and Unique Name, enter dDiscount. For the first outcome, enter the Name and Unique Name as ManagerApproval. Enter in the Resource Area {!fDiscount}, the Operator as greater than, and the Value as .9. .9 is equivalent to a 10% discount. Click Add Condition, then for Resource enter {!fDiscount}. Operator as less than or equal, and Value as .8. The .8 is a 20% discount. This means that the discount between 10 and 20 percent needs to go a manager.

Click Add Outcome. For Name and Unique Name, enter DirectorApproval. For Resource, select {!fDiscount}, for Operator, select greater than, and Value as .8. This will require an approval for discounts greater than 20%.

You can continue for more approval levels as needed. For this Flow, you will only need the Manager and Director approvals. Click on [Default Outcome] and enter NoDiscountNeeded as the Name. Click Ok.
Save your Flow.
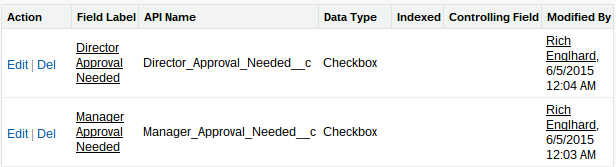
In order to link the Quote to an Approver, you’ll need to create a few fields on the Quote before you can move to the next step. Go to Setup, Quotes, Fields, and create a new field. The Type should be Checkbox, the Field Label should be Manager Approval Needed, and the Field Name should be Manager_Approval_Needed, everyone should have visibility, but you don’t want to add it to a page layout. Save the Field and create a new Field almost the same but with Director instead of manager.
Go back to your Flow.
Click on the sDiscountDecision Step Element and click Delete/Backspace to delete the Step. From the Palette, Drag an Assignement Element to the right of the dDiscount Decision Element. For the Name and Unique Name, enter aManager. For the Variable, create a new sobject variable and name it sovQuote, with Input/Output Type set to Input and Output and Object Type as Quote. Now, in the variable field, select {!sovQuote.Manager_Approval_Needed__c}, Operator Equals, Value as {!$GlobalConstant.True}.

Click OK.
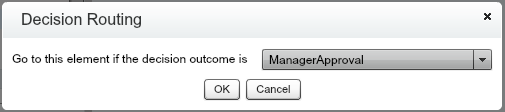
From the dDiscount Decision element, connect it to the aManager Assignment element. When prompted, select ManagerApproval for the Decision Routing.
Click OK.
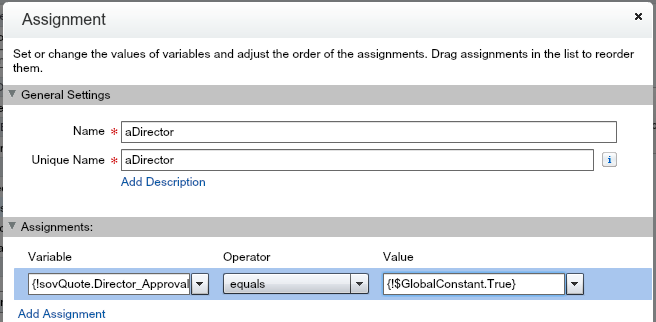
From the Palette, click on Assignment and drag it below the aManager Assignment Element. For the Name and Unique Name, enter aDirector. For the Variable, select {!sovQuote.Director_Approval_Needed__c}, Operator Equals, Value as {!$GlobalConstant.True}.
Click OK.
Connect the dDiscount Decision Element to the aDirector Assignment Element. When prompted, selectd DirectorApproval from the Decision Routing choice screen.

Click OK.
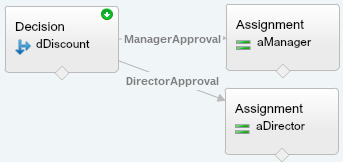
Your Flow should look like this (without Step elements showing).
For the last part, click on a Fast Update Element from the Palette and drag it to the right of the aManager Assignment Element. For Name and Unique Name, enter fuQuote, for Variable, enter {!sovQuote}.
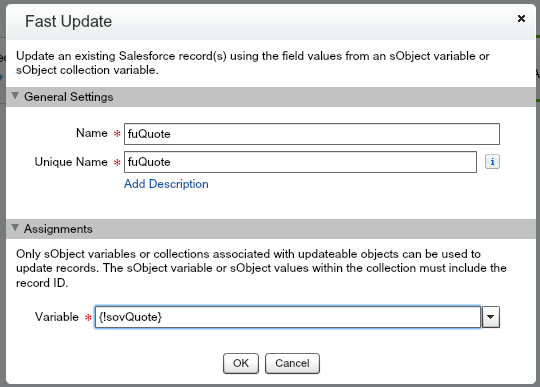
Click OK.
Connect both the aManager Assignment and the aDirector Assignment to the fuQuote Fast Update. Delete the final Step Element, sAssignApproval, and make sure the dDiscount Decision element is set as the starting element.

Make sure to save your Flow!
That’s it, congratulations, you’ve now set a field on the Quote that you can use in an Approval Step through a discount on the Quote Line Item!
