This is the first post in the second part of the Learning Flow series. In this part of the Learning Flow series, you’ll learn how to add Line Items using Pricebooks. Although this will eventually tie to Quotes as part of the Learning Flow series, it also applies to Opportunity Products (Line Items) and Order Products (Line Items). You’ve already shown the Pricebooks to your Users in the Quote Entry Flow, so now you’ll need to display the Products in the Pricebook for your Users to select.
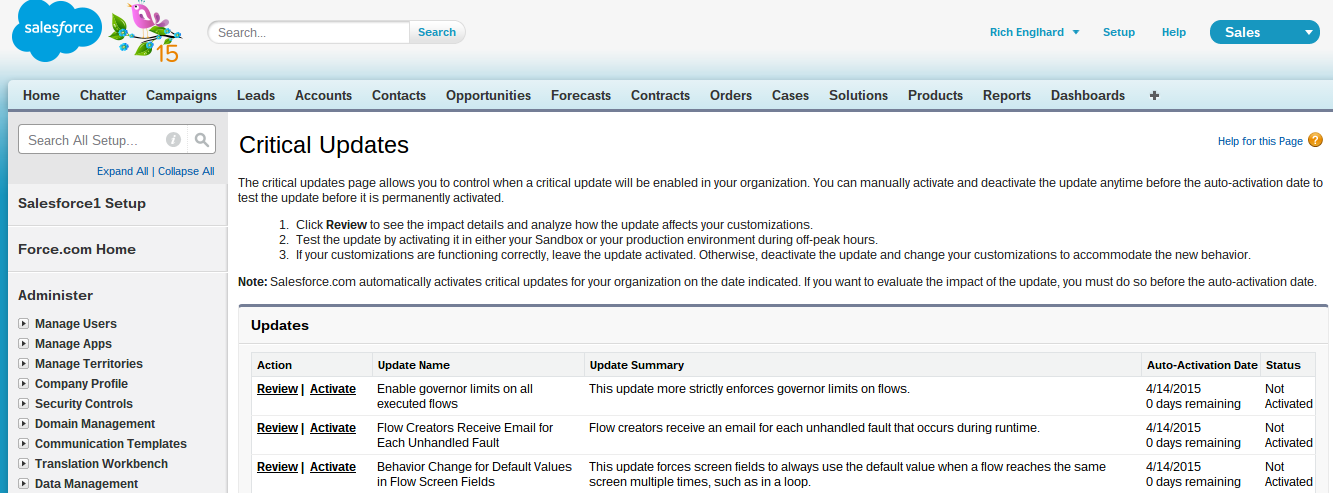
There are a few things you need to do before creating the Quote Line Item Flow. Go to the Setup menu, then in the search bar enter Critical Updates and click on Critical Updates. There are two Critical Updates that you need to Activate. The first is the one that says Flow Creators Receive Email for Each Unhandled Fault (so you get notified on faults!) and the second is Behavior Change for Default Values in Flow Screen Fields. The behavior change is very important as you’ll see later. Click Activate next to both of them.
Now, it’s time to create the Quote Line Item Flow! First, go to Setup, Flows, create a New Flow. Click on Resources, then double click SObject Variable. Enter the Unique Name as sovQuote, Input/Output Type as Input and Output, and Object Type as Quote. This SOject Variable allows you to pass the information from the Quote Entry Flow (you’ll set it up later) as well as update Quote fields as needed.

Click Ok. Drag a Screen element from the palette to the canvas. Name it, Select Product, and have Salesforce enter the Unique Name as Select_Product. Select, “Don’t show Finish button” in the Navigation Options and deselect the Show Pause button. Click Add a Field at the top and drag the Dropdown List choice to the right. Click on [Dropdown List] and enter the Label as, “Product To Add”, Unique Name should read “Product_To_Add”. Value Data Type should be Text, leave Default Value as “– Select One –“.
 On the Choice Dropdown List, where it says Select resource, Click on Create New, then Dynamic Choice. Enter the Unique Name as Products, the Value Data Type as Text, and in the Create a choice for each, select Pricebook Entry.
 Next, select Field equal to Pricebook2Id, Operator as equals, Value as {!sovQuote.Pricebook2Id}. Click Add Row to add one more row, for Field select IsActive, Operator should be equals, and Value should be {!$GlobalConstant.True}.

This will select the Pricebook Entries that are part of the Pricebook from the Quote and that are Active. This brings up a great question, what are Pricebook Entries? If Pricebooks are a type of grouping of Products and the associated pricing, for instance the prices for Non-Profit companies, Pricebook Entries are a mix of the Product and the Pricebook. Essentially, if Product A was in 2 Pricebooks, there would be 2 Pricebook Entries, one for each Pricebook and Product A. In thinking in objects and records, Pricebook 1, Product A, is Pricebook Entry 1A, while Pricebook 2, Product A, is Pricebook Entry 2A. This is significant because you can have different pricing per Product in different Pricebooks. Below is an example of 1 Product in 2 different Pricebooks.

Notice that the List Price is different between Pricebooks. This allows you to have different pricing where needed.
Back to the Flow. After the choice selection, in Choice Label, select Name and Choice Stored Value select Id. What this means is that when a User sees this Dynamic Choice, they will see the Name of the Pricebook Entry (the Product Name in this case), and the system will read the PricebookEntry Id. Check the box for Sort results by: and select Name in the Dropdown List. This will sort the Products by Name for the Users. Select Ascending after Name so that the Products show up in an A-Z order. Delete any rows in the Assign the record fields to variables to reference them in your flow, you won’t need them in this example.
 Click OK. You should see the Screen element again.
 Click OK. From here, the next step for the User is to enter information about the Product relative to the Quote. In order to do that, you’ll need to lookup the PricebookEntry. From the left side, click on Fast Create and drag the element below the Select Product Screen. For the Name and Unique Name, enter flPricebookEntry. Lookup the PricebookEntry object and select Field equal to Id, Operator should be equals, and for Value, click the Dropdown Arrow, select Screen Choice Fields, then Product_To_Add.
 For Variable, select Create New, SObject Variable. Enter the Unique Name as sovPBE (for SObject Variable PricebookEntry), Input/Output Type as Input and Output, and Object Type as PricebookEntry.

Click OK. The Variable in the Fast Lookup should now show {!sovPBE}. Check the box for Assign null to the variable if no records are found. For the Fields section, select Id, then Add Row, select Name, then Add Row, select Product2Id, the Add Row, select UnitPrice.
 Click OK. Next, connect the Select Product Screen with the flPricebookEntry Fast Lookup.

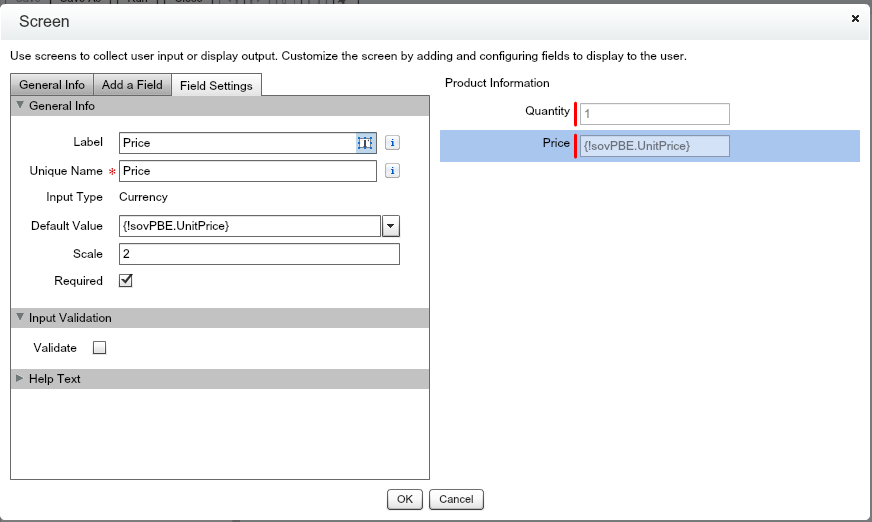
From the Palette, click on Screen and drag it to the Canvas below the flPricebookEntry Fast Lookup. For the Name, enter Product Information, the Unique Name should read, Product_Information. Select Don’t show Finish button and uncheck the Show Pause button. Click Add a Field, then double click on Number. Click on [Number] and enter in the Label and Unique Name, Quantity, the Default Value can be any number you choose, for this case, enter 1, enter Scale as 0, and check Required. The Scale is how many decimals there are after the number, in the case of 0.o0, the scale would be two. Since a quantity in this example needs to be a whole number, scale is 0 so that there are no decimals after the period.
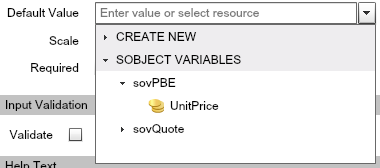
 Now, click Add a Field, then double click Currency. Click on [Currency]. Enter Label and Unique Name as Price. In the Default Value, select the Dropdown List, select sobject variables, the click the dropdown arrow next to sovPBE, then select UnitPrice.
For Scale, enter 2. This will allow Users to enter cents, allowing something like, $1.99. Check the box for Required.
Click OK. Connect flPricebookEntry Fast Lookup to the Product Information Screen element.

From the Palette, select Assignment and drag it to the canvas below the Product Information Screen. Enter the Name as Assign Quote Line Item Information and the Unique Name should read Assign_Quote_Line_Item_Information. For Variable, click the Dropdown arrow and select Create New, SObject Variable. For the Unique Name enter sovQLI for SObject Variable Quote Line Item. The Input/Output Type should be Input and Output and the Objectc Type should be QuoteLineItem.

Click OK. The Variable should now read {!sovQLI}, this means the SObject Variable was successfully created. Since you’re assigning parts of the QLI, delete the {!sovQLI} from the Variable lookup and enter in {!sovQLI.PricebookEntryId}, select the PricebookEntryId. Operator should be equals, and the Value should be {!sovPBE.Id}. Click Add Assignment. Select {!sovQLI.Product2Id} in the Variable, Operator as equals, and the Value as {!sovPBE.Product2Id}. Click Add Assignment, select {!sovQLI.Quantity}, Operator as equals, click the Dropdown Arrow for Value, then Screen Input Field, then select {!Quantity}. Click Add Assignment, select {!sovQLI.QuoteId} for the Variable, then Operator as equals, then Value as {!sovQuote.Id}. Click Add Assignment, select {!sovQLI.UnitPrice}, the Operator should be equals, and for Value, select the Dropdown Arrow, Screen Input Fields, then Price. The Value should show {!Price}.
 Click OK.
There is currently (what I believe is) a bug with Flows. Although entering {!Quantity} should be correct, the Flow will fail as a result of the bug. To have the Quantity be entered correct, on the line of {!sovQLI.Quantity} equals {!Quantity}, click the drop down arrow next to {!Quantity}, select CREATE NEW, then Formula. Enter the Unique Name as fQuantity, Value Data Type as Number, Scale as 0, and the formula should be {!Quantity}.

Click OK. This same bug affects the Unit Price as well. On the line with {!sovQLI.UnitPrice} equals {!Price}, click the drop down arrow, select CREATE NEW, then select Formula. Set the Unique Name as fPrice, Value Data Type as Currency, Scale as 2, and the formula should be {!Price}.
Click OK.

At this point, to create a seamless process later on with Approval Processes, you need to create a List Price field on the Quote Line Item object. In a new tab, go to the Setup menu, then Quote Line Item Fields. Click New. For the Data Type, select Currency, then Next. Enter the Field Label as List Price, Length as 16, Decimal Places as 2, Field Name as List_Price.

Click Next. Make it visible to all, Read-Only as False, and uncheck Add Field to the Page Layout so that it doesn’t add the field to the page layout. Click Save.
In the Quote Line Item Flow, go to the Assign Quote Line Item Info Assignment Element, click Add Assignment, enter Variable as {!sovQLI.List_Price__c}, Operator as equals, and Value as {!sovPBE.UnitPrice}. Click OK.
Connect the Product Information Screen to the Assign Quote Line Item Info Assignment Element.

From the Palette, select Assignment, and drag it to the right of the Assign Quote Line Item Info Assignment Element. Enter the Name as Assign QLI to Collection Variable and the Unique Name as Assign_QLI_to_Collection_Variable. For Variable, click the Dropdown Arrow, then select Create New, the SObject Collection Variable. For the Unique Name, enter socvQLI (for SObject Collection Variable Quote Line Items), select Input and Output as the Input/Output Type, and the Object Type as QuoteLineItem.

Click OK. The Variable should read {!socvQLI}. For Operator, select add, and for Value, select {!sovQLI}. This will add the sovQLI that you just Assigned to a Collection Variable of all QLI’s to create later after all QLI’s have been entered.

Click OK. Connect the Assign Quote Line Item Info Assignment to the Assign QLI to Collection Va Assignment.

From the Palette, select the Screen Element and drag it to the right of the Product Information Screen. For the Name enter, Add Additional Products Entry, and the Unique Name should read, Add_Additional_Products_Entry. Select Don’t show Finish button and uncheck the Show Pause button checkbox. Click Add a Field and double click the Dropdown List. Click on [Dropdown List]. For the Label, enter Add Additional Products?, and the Unique Name as Add_Additional_Products. For Value Data Type, select Text. For Choice, click the Dropdown Arrow, then Create New, then Choice. For the Label, Unique Name, and Stored Value, enter Yes. The Value Data Type should be Text.

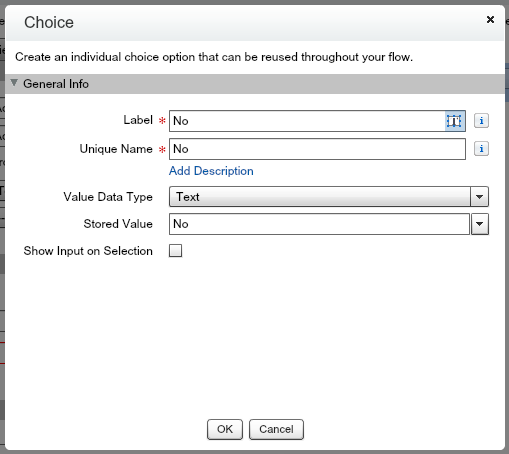
Click OK. Click Add Choice. Click the Dropdown Arrow, then Create New, then Choice. For the Label, Unique Name, and Stored Value, enter No. The Value Data Type should be Text.
Click OK. If you’d like to create a Default Value for the Screen, you can do so now. For this Flow, click Yes, as most Quotes will have more than 1 Product.

Click OK. Connect the Assign QLI To Collection Va to the Add Additional Products Entry Screen.

From the Palette, click the Decision Element and drag it to the right of the flPricebookEntry Fast Lookup. For the Name, enter, User Selection for Additional Products, and the Unique Name as User_Selection_for_Additional_Products. For the first Editable Outcome, enter “Yes, add Product” as the Name and “Yes_add_Product” as the Unique Name. For the Resource, select Screen Choice Fields, then Add_Additional_Products. For the Operator, select equals, and for the Value, select Choices, then Yes.
 For the Default Outcome, enter No, do not add Product.
 Click OK. Connect the Add Additional Products Entry Screen to the User Selection for Additional Decision Element.
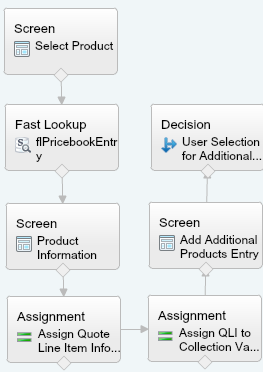
Connect the User Selection for Additional Decision Element to the Select Product Screen Element. In the window prompt, select Yes, add Product. Click OK.
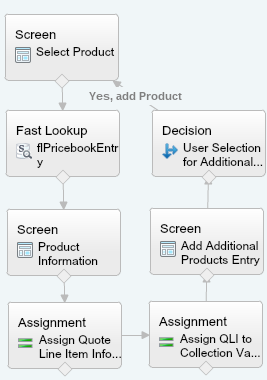
This will bring the User back to the original product selection if they choose to add additional products. (This is the reason the critical update for Behavior Change for Default Values in Flow Screen Fields is so important!) Set the Select Product Screen element as the start element. Save the Flow as Quote Line Item.

Click OK. Congrats! You’ve done the first part of the second section of Learning Flow. This Flow will allow Users to select an active Product from the Pricebook that was set in the Quote, set the Price and Quantity, and give the User the option to add another Product or continue on with building the Quote. In the next part of Learning Flow part 2, you’ll do more with the line items to loop through the Quote Line Items and add them together to show how many items were added to the Quote! In this lesson, you created a Loop, without using the Loop element, to allow Users to enter more than 1 Quote Line Item!

Hello,
First of all thanks for this info. I have found it really helpful, and I have used the Quote Line Item example for my own project. There is something I would like to add to it that I can’t quite figure out. I would like to provide a summary of the products on the ‘Add Additional Products Entry’ screen. This would help the user to keep track of what they’ve already added and what still needs to be added…helpful in cases where several line items are needed.
I have tried using the loop element to loop through sovcQLI to add the values to a text field, but it doesn’t seem to work…so curious to see if you have any ideas.
LikeLike