In Part 1 of Lightning Components in Flow, we looked at how to get a Lightning Component to show a list of records. This post is an extension of Part 1, so since we’re building upon it, make sure to have Part 1 done.
In Part 2, we’re going to look at how to select records and send them back to the flow, create a Lightning App Page, and be able to use this form the Salesforce mobile app as well! And all of this without any Apex! That means that we can query records, select them, send them back to the Flow, without any test classes. Now, with great power comes great responsibility, so make sure you sufficiently test your solution before you move it to production.
To start, we’re going to update our code for the Lightning Component, review what it means, and then build upon the Flow that we created. We’re also going to use an almost unnoticed update from Summer 18 for Flow sObject Collection counting, a great example of the importance of it! Ok, let’s get started!
Open your developer console, navigate to your displayAccounts Lightning component, select the Component piece (displayAccounts.cmp) and add the code below. Let’s break it down.
<aura:component implements=”lightning:availableForFlowScreens” access=”global” >
<aura:attribute name=”accounts” type=”Account[]” access=”global” />
<aura:attribute name=”columns” type=”List” />
<aura:attribute name=”selectedAccounts” type=”Account[]” />
<aura:handler name=”init” value=”{!this}” action=”{!c.init}” /><lightning:datatable data=”{!v.accounts}”
columns=”{!v.columns}”
keyField=”Id”
onrowaction=”{!c.viewAccount}”
onrowselection=”{!c.updateSelectedAccounts}”/></aura:component>
First, you’re going to see a new attribute, named “columns”, and the type of list. This will be the columns in table, using a new base Lightning Component, lightning:datatable, instead of the aura:iteration component. This new lightning:datatable gives us some great power that automatically creates checkboxes and allows us to easily set an attribute based on our selection.
Next we see an attribute, named “selectedAccounts”, that is the type of Account[], just like in Part 1. This is the attribute where we’ll store the Accounts that the User selects using the checkboxes from the lightning:datatable. The next piece is an aura:handler with the name init. This will automatically kick off some code that we have in the controller part of the displayAccounts Lightning component, which we’ll review on the controller part. The last piece is our lightning:datatable. Here we are saying the data that we want to display is the variable, “accounts”, which if we look at the attributes, we set the variable “accounts” in Part 1 as our Account list. As a reminder, it has the “[]” at the end to signify that it is a list of Accounts instead of just a single Account.
Next we have the variable, “columns”, which is the new attribute. We don’t have any columns set in the attribute, but not to worry, we’ll set them in the controller. We have our keyField set as “Id”, meaning the Id is the key that differentiates the row list. This is important as we’ll use the Id for navigation later to see details of the Account. Next is the onrowaction, which what we’re saying is that when there is a row action, which we define in columns, we want to run a certain code in the controller.
And last, but certainly not least, we have the onrowselection. This is the code that we want to fire in the controller when a row is selected (or unselected), which is why we are using the lightning:datatable!
Ok, now, let’s click on the sidebar to go to the controller of the lightning component.
Below is the code for the controller. Let’s dive in to what it means.
({
init : function(component, event, helper) {
var actions = [{label: ‘Show details’, name: ‘show_details’}];component.set(‘v.columns’,[
{label: ‘Account Name’, fieldName: ‘Name’, type:’text’},
{label: ‘Phone’, fieldName: ‘Phone’, type:’phone’},
{label: ‘Website’, fieldName: ‘Website’, type:’url’, typeAttributes:{target: ‘_blank’}},
{label: ‘Owner’, fieldName: ‘Owner_Name__c’, type:’text’},
{type: ‘action’, typeAttributes:{rowActions: actions}}
]);
},
viewAccount : function(component, event, helper) {
var action = event.getParam(‘action’);
var row = event.getParam(‘row’);
window.open(‘/’+row.Id,’_blank’);
},
updateSelectedAccounts : function(component,event,helper){
var selectedRows = event.getParam(‘selectedRows’);
component.set(‘v.selectedAccounts’,selectedRows);
}
})
First we have the init, which is fired when the Lightning Component is loaded. In this, we have a variable that we declare, “actions”, which has a label and name. This is what will show in the drop down for actions. If you’re wondering what an action is, take a look at a list view on the far right side. You have a little drop down that gives you different options, depending on User permissions, for Edit, Delete, and Change Owner. In this case, we want to be able to see the details of the Account, so we are letting the User know they can see the details if they click the “Show Details” action. Next we are setting the columns. We are doing this by component.set to say we are setting something in the component, then we are saying what we are setting with ‘v.columns’, and then we are creating a list (see the “[]”?) which contains various attributes. Label is the column heading, the fieldName is the name from the field on the Account record, type is what the field type is, typeAttributes give us some additional context, in the instance of the ‘url’ type, we are setting target to equal blank so that it opens in a new tab, and then last we have rowAction, which we are telling the data table that we want to show the list of actions that we set above in the var actions. Note that there is no label for the type of action, this is because if you look on your list view, there is no heading, it is just reserved for the drop down to click on the action.
Second, we see “viewAccount”, which is going to be what happens when any action is clicked. We only have 1 action in our lightning:datatable, so we don’t have to worry about setting the action by the action name, but if you were to create a lightning:datatable with multiple actions, then make sure you look at the notes and only do the action if it is the right action to do it for. You can find more information on lightning:datatable here. Since we have the 1 action, lets review. We are setting a variable, “action”, from the event.getParam(‘action’). What this means is that there was an event (a click in this instance), and we want to get the action from it. Now, this is very important for the multiple action piece, but since we aren’t worried about that, this is just good practice to ensure that you’re capturing the action information. Next, we have a variable, “row”, which is the row data of the action. Again, there was an event, and as part of that event there was a parameter named row, and we want to know that information. The next line is a piece of javascript, window.open. There are better ways to navigate Lightning Components with things like navigateToURL or navigateToSObject, however since we are using this in the flow, the window.open helps to navigate. We are setting the URL that we are navigating to as /row.Id, which is a URL that is saying, send us to the record based on the Id of the row in which the action was clicked from. In addition, we are telling the window to open in a new tab with the ‘_blank’.
Third, we are using the updateSelectedAccounts to set the Accounts which were selected so that we can send them back to the Flow. Very important! we are creating a variable, selectedRows, and since there was an event (a click by way of a selection), we are getting the parameter from that event, in this instance ‘selectedRows’. This is a function of the lightning:datatable and another great reason that we are using it instead of something like the aura:iteration from earlier. Last, we are saying, on the component, set the variable ‘selectedAccounts’, with the value of the selectedRows event.
As the last part of code, we need to click on the design part of the sidebar this time. We need a new design:attribute, selectedAccounts, so that we can send the Accounts that the User selects back to the Flow.
<design:component>
<design:attribute name=”accounts” label=”Accounts” />
<design:attribute name=”selectedAccounts” label=”Selected Accounts” />
</design:component>
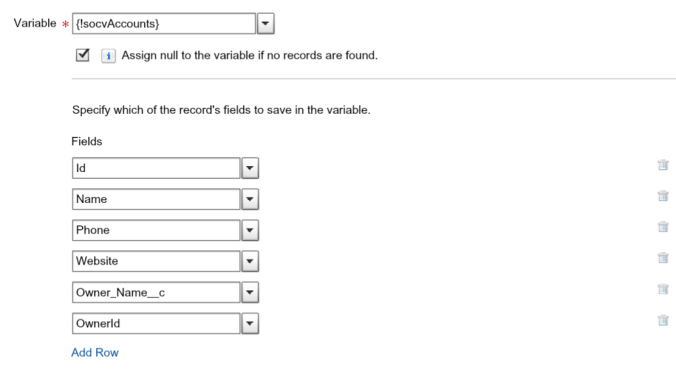
Ok, now that the code has been updated and explained, let’s go back to the Flow. As the end goal, we want to do something with the records that the User selects. In our example, we’re going to send a Chatter post to the Owner of the Account asking for help with the referral. So, in our Fast Lookup, flAccounts, we need to add the field OwnerId as a field to save in the variable. It should look like below now.
Next, we need to go to our Flow screen for the Account List. We need to go to the Lightning Component and then to the Outputs section. Set the attribute as Selected Accounts (from the design part of the Lightning Component) and the variable as a new sObject Collection Variable, socvSelectedAccounts, type of Account. This sends the Accounts that the User selected in the Lightning Component back into our Flow into the sObject collection variable so that we can do things in the Flow with those records.

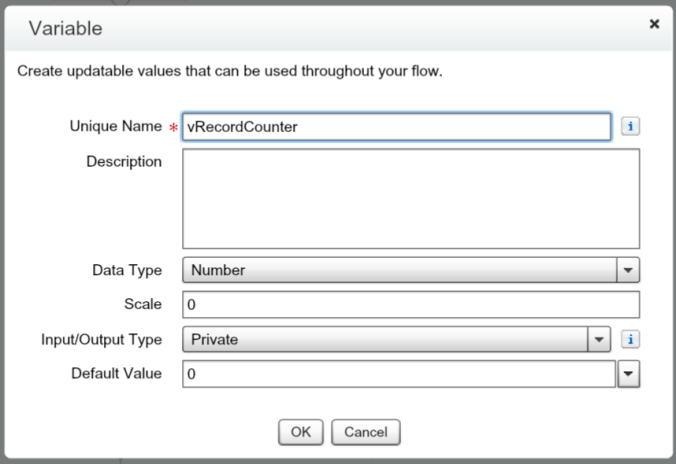
You now have the records in your Flow, so if you have plans, continue and build! In this example, we are going to loop through and post to Chatter on the Accounts. There’s one other thing though. We want to ensure that there are Accounts selected. So we are going to check if there are Accounts in the sObject Collection Variable. How do we do that? We use the new Summer 18 feature to tell us how many records are in it! First, create a variable, vRecordCounter, with the Data Type of Number, Scale 0, and Default Value as 0.
Next, create an Assignment, recordCounter, and in the assignment, select the variable ‘vRecordCounter’ as the variable, the operator equals count, and the value as ‘socvSelectedAccounts’. And there it was, the almost hidden feature of Summer 18! The ability to set the variable as the count of the records in the sObject Collection Variable. This means we don’t have to loops through to find out how many records there are in a separate counter. The benefit for us is that we can do one thing if the number of records is greater than 0, another thing if there are 0 records.

At this point, you should be familiar with all of the rest of the Flow pieces, with perhaps the Chatter piece being new. So, I’m posting the full Flow and will only discuss the Chatter piece in detail, as screens, decisions, and loops should be familiar.
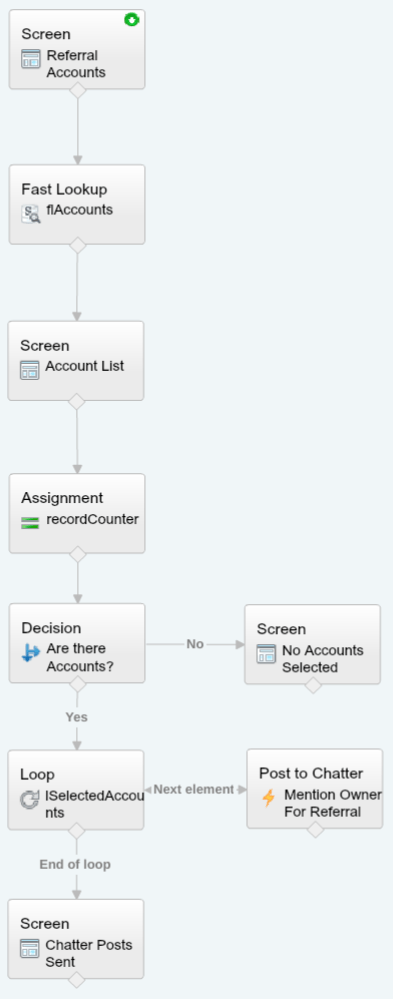
The first thing is the decision, in the decision we are asking if there are Accounts in the sObject Collection Variable. We are deciding this for yes by the vRecordCounter being greater than 0. If there are no records, then we are going to send the User to a screen to let them know they didn’t select any Accounts. I set this as not allowed to be finished, meaning that the User needs to click previous and select an Account, but perhaps not selecting an Account is ok and can be ok to finish the Flow. If there are Accounts, then we are going to Loop through them and for each Account, we are going to post to Chatter and mention the Owner of the Account asking for help. For the Chatter post, we are going to select from the actions of the Flow canvas, Post to Chatter.

The main part is that we have the Owner Id in brackets after the ‘@’ symbol. This is what mentions the Owner in the Chatter post for them to respond. If you’re interested in the full message, see below.
@[{!sovAccount.OwnerId}] I am looking for a referral for a customer with the Company Size of {!Company_Size} and the Industry in {!Industry}. I see that {!sovAccount.Name} is a referral Account with that Company Size and Industry. Would you be willing to make an introduction for an Account Referral?
The final part of the Flow is another screen that we send the User to in order to let them know that the Chatter post(s) have been sent. We can now save this Flow and Activate it after you’ve tested that it works! The Flow is done, but we still have one more thing to do. We’re going to create a Lightning App Page to host our Flow, which means that we can also add it to the Salesforce mobile app!
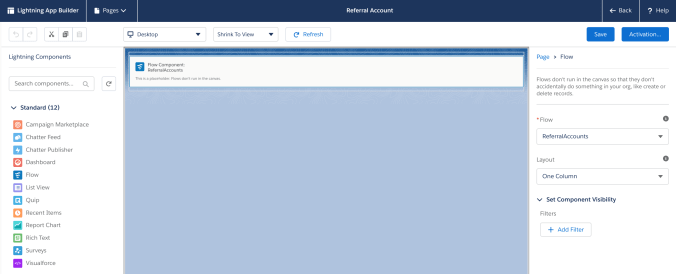
To start, make sure you’re in Lightning, then go to Setup, then Lightning App Builder. You’ll see a list for Lightning Pages, click the New button. Then select App Page, enter the name as Referral Account, select One Column for the layout, and click Finish. Now you’ll see a blank screen. Let’s drag the standard Flow component to the column, and select the ReferralAccounts Flow. It should look like below.
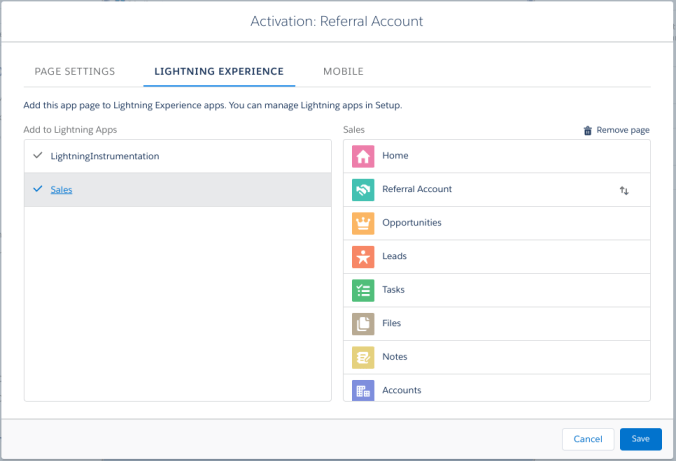
That’s all we are going to add to this page. So click Save, and you’ll be prompted to Activate. Let’s do it! First, we’re going to set the Page settings. Since this is for getting referrals, I thought the hand shake icon was a good fit. We’re going to activate it for All Users.

Next, you can add it to the Lightning Experience Apps that you have in your Org. In my instance, I added it to the two I have, Sales and LightningInstrumentation.
And last, click on Mobile and add the Referral Account Lightning Page App to the Salesforce mobile app navigation.
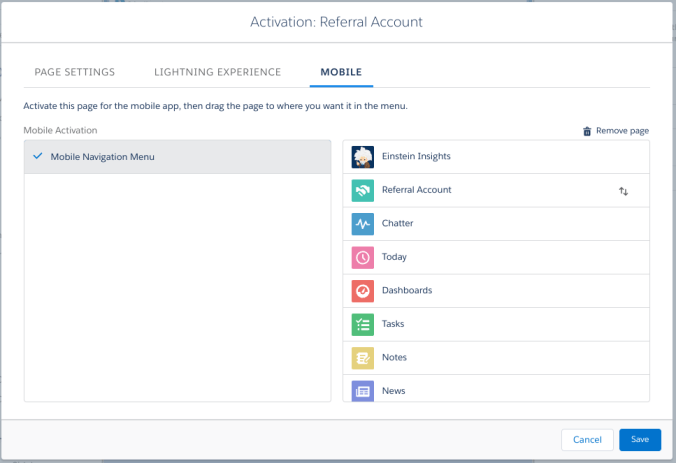
Click Save. And that’s it!
We’ve created a Flow that uses a Lightning Component, without having to use Apex, and we send the Lightning Component a list of Account records, let Users select the records they want, and send the selected list of Account records back to the Flow, to be able to do as we please. We explored the ‘equals count’ operator from Summer 18, Post to Chatter, and allowed the Flow to be used in Lightning and the Salesforce mobile app! What an amazing way to learn about Lightning Components in Flow!
How are you planning to use or how have you implemented Lightning Components in Flow? Let us know in the comments!

Great tips.Thank you
LikeLike
Hi Rich, thank you for the blog
At this time, is it possible to return a list of records within a flow and have the user have the ability to edit columns/fields from the returned list in the flow?
Example, list of 3 accounts are returned and one of the columns is “phone number”. From that list, within the flow, the user could edit the phone number values and after clicking next, the flow would go update those 3 account records with their new phone number?
LikeLike