In the Spring 18 release, Salesforce introduced the ability to show a Lightning Component inside a Flow screen. It took me a while to be able to play around with this, but I am VERY excited for this! This is not for first time Flow creators. If this is your first time with Flows, look through some of the other posts on this blog in Learning Flow, Part 1. But if you have some Flow background, get excited for Lightning Components in Flow screens! Before we get started, I want to break down a few questions that you might have as I had them as well.
First Question: Lightning Components mean code, why would we use them in a Flow? That is correct, it is code. I think of it like this. Let’s take the example of an Account List. The Lightning Component displays the Account List, however, you are controlling the logic to get the list in the Flow. So, this means you’re not having to write code to create an account list or the logic, an admin controls that in the Flow, but the displaying of a list, Flows are not good at, so being able to send this to a Lightning Component to display is a lot easier than integrating with a Visualforce Page or writing everything in code.
Second Question: Aren’t Lightning Components hard? Lightning Components do mean code, but if you can put together a Flow, you can start to understand the logic for Lightning Components. With something like showing a list of Accounts, the code required is very easy. Salesforce has done a GREAT job expanding the base components for Lightning Components. What’s a base component? Think about the Dynamic Picklist Choice in Flows. There would be a LOT of code to be able to get that done. But Salesforce made it very easy and allows you to just select the Object and Field. Base Components are similar, they are building blocks of Lightning Components, like the Dynamic Picklist Choice is in a Flow, and Salesforce takes care of the heavy code, so you just need to let them know a few key values to have their code run in the background.
Third Question: Doesn’t this belong in a development blog? NO! I know you can do this! As you’re learning Flow, you’re learning some of the logic of development. This post will help you to expand just a little bit beyond Admin, to what some might call Adminvelopment, where you start to dabble in development. The Lightning Component in this post is very lightweight, we are not going to have a controller or call apex, we are just going to display a list of Accounts and send that list from the Flow to the Lightning Component.
Ok, so where did this post come from? For that, I have to thank Jocelyn Fennewald and Salesforce Saturday. If you haven’t been to a Salesforce Saturday, you should attend. What is it you ask? A bunch of Salesforce people hanging out on Saturday and talking about Salesforce and maybe doing some trailhead. Why should you go? Because you never know what you’ll learn, where the conversation goes, or in this instance, what you’ll be able to help someone with and be inspired to learn something new.
So what is this post about? Great question. Jocelyn asked me if it was possible to use Flows to be able to create a way for a User to be able to look for referral accounts that match a User’s criteria. Flow is great to be able to get the Account List based on a a few variables, but showing that list in Flow, well, that’s where the Lightning Components in a Flow screen come in handy! What this post will help you learn is taking input from a User, finding a list of Accounts that match, and displaying those Accounts back to the User. We’ll expand upon it in another post, being able to select records in the list and do something with them, but for this post, we’ll stick to the simple idea of displaying a list of Accounts.
To start, we are going to eat the frog (for those who are not familiar with the term, it means to start with the worst (or perhaps hardest) thing on your plate first and then everything else after that will be easy) and start with the Lightning Component. Why? Well, if we want to call the Lightning Component from the Flow, we need to have it written to be able to call it.
Start out by going to the developer console. To do this, start by clicking your name and selecting Developer Console.

Once the Developer Console is open, go to File, then New, then Lightning Component.

Set the name of the Lightning Component to displayAccounts and don’t worry about anything else. Just click Submit and wait a few seconds until your screen looks like the second image below.


Let’s stop here and look at a few things. First, on the left side, this is where we have our code. Second, on the right side, these are the different parts of a Lightning Component. The component is the “main” part of the Lightning Component. We are going to look at the component and the design parts of the Lightning Component. The design part is where you can allow input variables into the Lightning Component, we’ll use the design part to send our list of Accounts from the Flow to the Lightning Component.
To start, I’m adding the code of the component. I’m doing this so that we can review together what is going on, line by line, so that you can understand how the Lightning Component is built.
<aura:component implements=”lightning:availableForFlowScreens” access=”global” >
<aura:attribute name=”accounts” type=”Account[]” access=”global” /><aura:iteration items=”{!v.accounts}” var=”a” >
Account: <a href=”{!’/’+a.Id}” target=”_blank”>{!a.Name}</a> | Phone: {!a.Phone} | Website: {!a.Website} | Owner: {!a.Owner_Name__c}<br />
</aura:iteration></aura:component>

Ok, so let’s break it down. The first line you’ll notice that we have two pieces added. First is {implements=”lightning:availableForFlowScreens”}. This allows us to use the Lightning Component in the Flow screen. The second part is {access=”global”}. This is in the Salesforce documentation example, so I left it in, but the access=”global” means that it is usable outside of your own org, such as to make a component usable by a flow admin in another org. If you don’t have multiple orgs that you want to use this, you can leave the access off completely and it will default to public, which means use for your org only.
In the next line, we have:
<aura:attribute name=”accounts” type=”Account[]” access=”global” />
What this is saying is that we want an attribute, think resource from a Flow, like Variable or sObject or sObject Collection, and we want the variable type to be an Account List (the [] means List instead of just a single Account) and we have set the access of this to be global, which again means that the variable is available to the Flow in all orgs.
After that, we have the Account List.
<aura:iteration items=”{!v.accounts}” var=”a” >
Account: <a href=”{!’/’+a.Id}” target=”_blank”>{!a.Name}</a> | Phone: {!a.Phone} | Website: {!a.Website} | Owner: {!a.Owner_Name__c}<br />
</aura:iteration>
We have 3 lines. First, is <aura:iteration>. The iteration means that we want to, as we call it in a Flow, loop over a list (or a sObject Collection Variable as with Flows), in this case, we set the list to be the account list through the items=”{!v.accounts}”. Since the attribute name is named accounts, that is what the “v.accounts” is referring to. We have var=”a” to be able to reference the Account record that the loop is going through, similar to looping through a sObject Collection and using the sObject Variable as the record. Second, we are just displaying the information from the Account record. As you can see, these references are like formulas. In this instance, we are setting a field name and populating the information after it with the “formula”, such as {!a.Phone}. The <a> tag is an html tag that allows you to have a link, so in this instance, we are going to allow a click of the Account Name to take a user to the Account in a new tab. We are also using which stands for non-breaking space. HTML doesn’t recognize multiple spaces after each other, so we use to ensure there is a space. The last part of the line, <br />, is like hitting enter/return when you type, it creates a new line. The br stands for line break. Third, we are closing the <aura:iteration> by writing it again but with a /. If you notice the BR tag, it ends with a /, meaning that it is “self closing”. The iteration part needs to be closed. So we open with <aura:iteration> and close with </aura:iteration>. That’s it for the “code”. Next, we’ll look at the design part. To do that, click on design.
When you do that, you’re going to see the blank design part.
<design:component>
</design:component>
As we spoke about above, this is the opening for the design piece and the closing. We’re going to add just one line between the opening and closing.
<design:attribute name=”accounts” label=”Accounts” />
What this line does is allow us to set the attribute named “accounts” and we will show the User the attribute by the label, “Accounts”. When you have it all together, it should look like the below code and image.
<design:component>
<design:attribute name=”accounts” label=”Accounts” />
</design:component>

And that is it! That’s all our Lightning Component entails. Pretty easy, huh? I knew you could do it!
There’s one more piece of setup on the Account object before we get to the Flow. If you notice in the code for the component part, we have a custom field. We’re also going to have 2 more custom fields that the Flow will need. So, first you need to create a formula field on the Account, Owner_Name__c, where you will simply have the Owner.FirstName and Owner.LastName so that when the User looks at the Account, they will know who to contact internally to start a referral conversation. Second, on the Account, we’re going to list Accounts as referrals, so let’s create a checkbox field, Referral_Account__c. Also, instead of entering the number of employees a company has, we’re going to use a picklist to create a range. So create a picklist field, Company_Size__c, on the Account. You can use whatever range you’d like, but if you want to use what we’re using here, we’re using 0-20, 21-100, 101-250, 251-500, 501-1000, and 1000+.
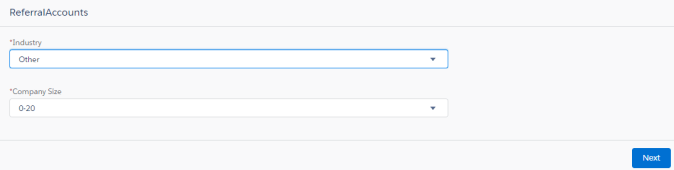
Now, let’s get to the Flow! Create a new Flow. When you get to the canvas, we’re going to start by bringing in a Flow screen. This first screen will be for the User to select the Industry and the Company Size so that they can find similar referral Accounts.

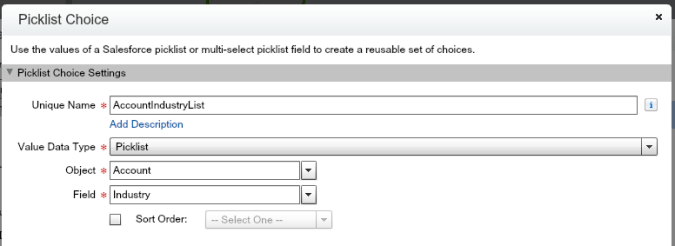
For the two fields, Industry and Company, Size, use a Picklist Choice.
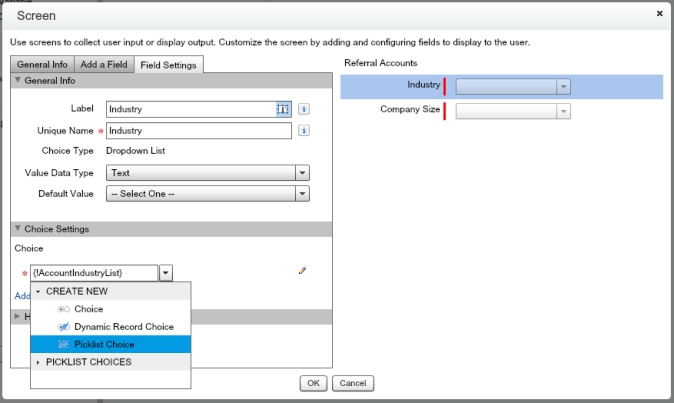
For the Picklist Choice, we’ll start out with the Industry picklist.
Then, we’ll set up the Company Size list.

After that screen, we need to lookup the Accounts that match. For this, we’ll use a Fast Lookup and then search for Accounts where Referral Account is True and the Industry and Company Size match the selection in the screen we just created.

For the Variable, make sure to select a sObject Collection Variable, NOT a sObject Variable. The Collection is a list which allows us to see all the Accounts that match, instead of the first one. Beyond that, let’s capture the fields that you want to use in the List. In our example, that is Id, Name, Phone, Website, and Owner_Name__c.

The last piece we will do is add another Screen. The canvas should look like this.

For the Account List Screen, click “Add a Field” and then look for Lightning Component under extensions.

When you click on the field, it will take you to a page that you will select the Lightning Component and Inputs. For the Lightning Component, select the one that we just created, displayAccounts, and then for the inputs select the Attribute that you created, Accounts, and the sObject Collection Variable, socvAccounts, as the value.

Click OK. If you get an error, look at Outputs. There might be an Output (we don’t have one in this example) that the Flow auto added that is blank. Click the trash can next to it to get rid of it.
That’s it! Now we have a Flow that will allow users to select the Company Size and Industry and show the User the List of Accounts that match!

One thing to note. Since we are using a Lightning Component, it will only work on Flows that run in Lightning Runtime. To make sure that you have it turned on, go to Setup, Process Automation Settings, and then make sure the box next to Enable Lightning runtime for flows is checked.

We’ll take a look in a future blog post about how to make the list selectable and send the selected items in the list back to the Flow. Stay tuned!
How are you planning on using Lightning Components in Flows? What sort of lists will you show your Users? Let us know in the comments!

You had me interested up until your screen shots weren’t using Flow Builder. Will these be updated? I’m stuck on creating Flows that use a lightning component to update fields on an existing record. Most examples use the older design.
LikeLike
Hi, thanks for walking through this example. I’ve tried to extend this to a custom sObject list for a screen flow but when I pass in the record collection in my flow, I only get the SLDS spinning logo. However, if I use your accounts example, it works perfectly. Any idea of what’s going on?
LikeLike
Hi Anthony,
You would need to update the Lightning Component to not use Account but rather use the object API name that you’re looking to put into a list. I hope that helps!
LikeLiked by 1 person
Yeah that helped Rich. I figured my error out. The issue was that the custom object had geolocation fields. Using a custom record collection variable instead of selecting to automatically create it and including only the fields I needed in my flow resolved the error. I couldn’t find a source for the geocode issue but wanted to share my findings in case anyone else experiences the same issue. I’ve learned a lot from this post so thanks for sharing and for the help.
LikeLike