Planning a Flow is a very important piece of creating Flows. So far, you’ve been learning from what the posts tell you to do. What about new Flows where you need to plan out a process? Well, the Step Element will allow you to plan out your Flows! You can’t activate a Flow with a Step element, but it will allow you to plan it out to make sure you are entering all the Flow steps needed to create a successful Flow!
Open the Quote Line Item Flow. From the Palette, click on the Step Element in the Draft Tools section. Drag it to the left of the aQRU Assignment Element. Enter the Name and Unique Name as sAP for Step Approval Process. Enter in the Description, This step will loop through the Quote Line Items to be able to see what level of Approval is Needed.

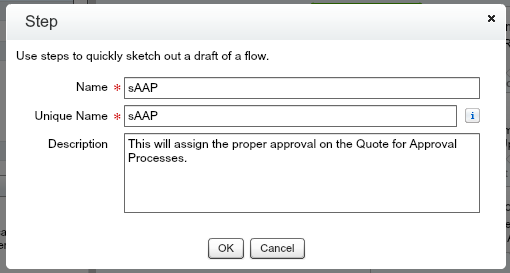
Click OK. Click on the Step Element in the Palette again and drag it above the sAP Step Element. For the Name and Unique Name enter sAAP for Step Assign Approval Process. For the Description enter, This will assign the proper approval on the Quote for Approval Processes.
Click OK. Click on the arrow between the aQRU Assignment Element and the fcQLI Fast Create Element and click delete/backspace to delete the arrow.
![]()
Now, connect the aQRU Assignment Element to the sAP Step Element, the sAP Step Element to the sAAP Step Element, and the sAAP Step Element to the fcQLI Fast Create Element.
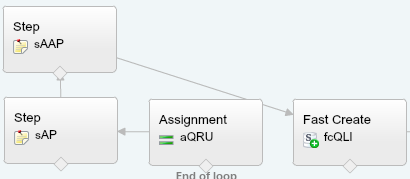
This now lets you know that for the Flow, you need to create a Step, sAP, as well as the Step sAAP, before you can go to the fcQLI Fast Create Element. In the next lesson, you’ll create the necessary parts of the Flow to replace the Steps, but these Steps let you know what needs to be added to the Flow before it is complete.
Save you Flow!

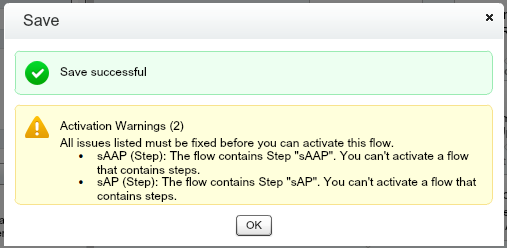
Click OK. You should see an activation warning.
Click OK. You will update the Flow in the next lesson to create the Approval Process and remove the Step Elements to finish the Flow.
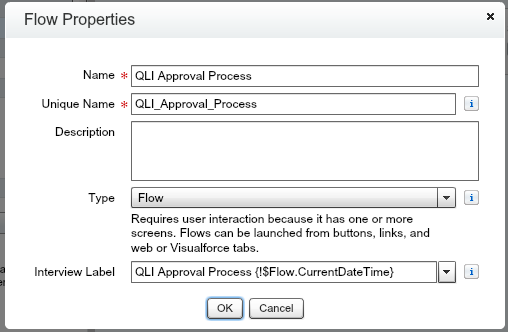
As part of Quotes, your business has asked that any discounts greater than 10% get approval from a Manager and any discounts over 20% get approval from a Director. Now, it’s time to create a new Flow to handle these Approval Processes. To start, go to Setup, Flows, and create a new Flow. Drag a Step Element from the Palette to the Canvas. Enter Name and Unique Name as sQLIDiscount and the description as, Check the discount amount of the QLI.

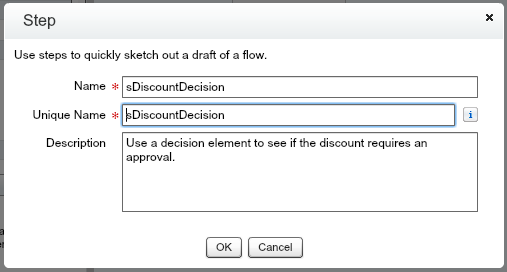
Click OK. Drag another Step Element to the right of the sQLIDiscount Step Element. Enter sDecisionDiscount as the Name and Unique Name and enter for Description, Use a decision element to see if the discount requires an approval.
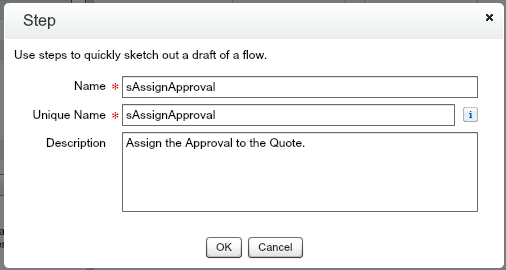
Click OK. Drag another Step Element to the right of the sDiscountDecision Element. For the Name and Unique Name enter sAssignApproval and for the Description enter Assign the Approval to the Quote.
Click OK. Now, select the sQLIDiscount Step Element as the Start Element, connect the sQLIDiscount Step Element to the sDiscountDecision Step Element and then connect the sDiscountDecision Step Element to the sAssignApproval Step Element.

Save your Flow!
Click OK. Don’t worry about the Activation Warnings, you will update the Flow in the next lesson.
These Steps let you know on the Quote Line Item Flow you need to add two new parts, and on the QLI Approval Process Flow that you need to add three new parts to map out the Approval Process.
Congratulations, you have learned how to add the Step Element to a Flow to plan out Flows and make sure that the logic in a Flow is thought out before building out the Flow!
