Perhaps you have written a Flow and have seen this cryptic message.

NO!!! What happened!? Does your User know something went wrong? Where did this come from? This post, part 1.D of the Learning Flow series, will help you learn how to get better error message handling for both your Users and your Admins.
From my experience with Flows, a lot of Flows are based around the User, such as the Quote to Contract system you’re building as part of Learning Flow. This means that Users want a resolution quickly, they are doing something and would like to complete that task immediately. This means that quick notifications are very important, ones that will just work and won’t possibly have different issues themselves. It’s time to get started.
When trying to troubleshoot, if it is a Flow that a User is running (like the Quote creation) and NOT headless (where the system will update it without human intervention), it’s important to know who is having issues. Start out the entire Flow by looking up the User first. You’ll pass the variables into the Flow via a button later, but for now, create a new Variable, called vUserName, by going to Resources and double-clicking on Variable. You might ask, why User Name? User Names are unique across ALL Salesforce Organizations, including trials and developer orgs, so you’ll never have to worry about a duplicate by using User Name. Data Type should be text and the Input/Output Type set to Input and Output.
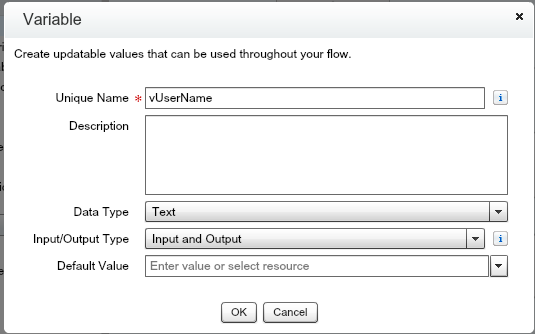
Click OK.
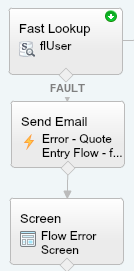
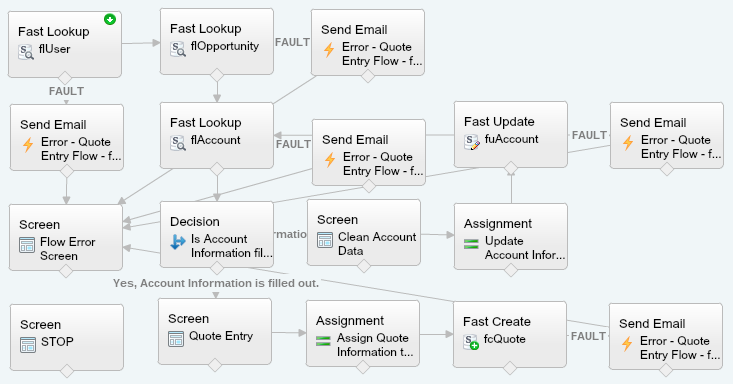
Now, click on Palette, then click and drag Fast Lookup over to the canvas to the left of the flOpportunity Fast Lookup. For the Name and Unique Name, enter flUser. Lookup User and have the Field set to Username equals {!vUserName}. In the Variable section, click the drop down arrow, select Create New, and then select sObject Variable. Name the sObject Variable sovUser.
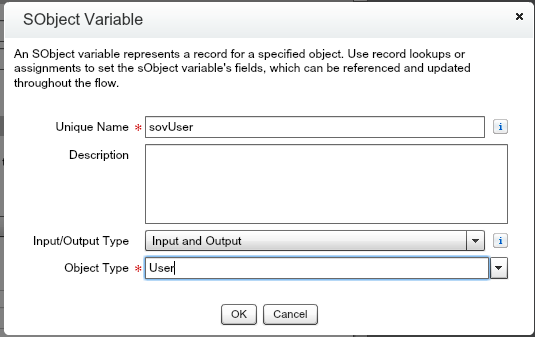
Click OK. You should see the flUser Fast Lookup edit screen.
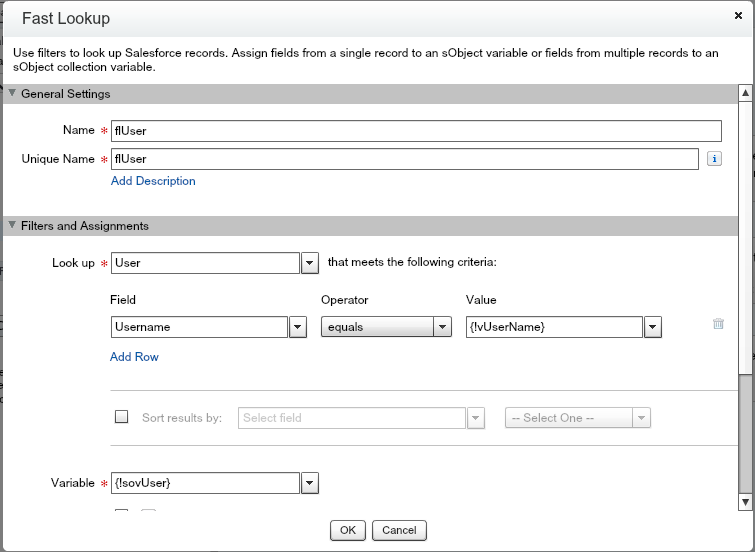
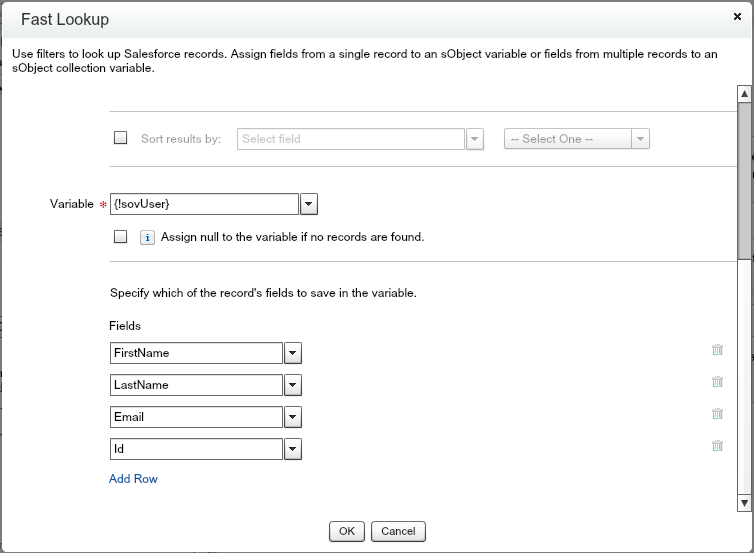
Do not check the box for the Assign null to the variable if no records are found. For the Fields section, select FirstName, LastName, Email, and Id.
Click OK. Now, connect the flUser Fast Lookup to the flOpportunity Fast Lookup.

Set the starting element as the flUser Fast Lookup element.

Save your Flow, since this is a new post in Learning Flow, click Save As and enter the name as Quote Entry v4 and change the description to, Added a Fast Lookup for User and Added Error Handling. Click OK.
Now, go to the Palette and scroll ALL the way down. Keep scrolling! At the very end you’ll see Static Actions. There are three static actions, Post to Chatter, Send Email, and Submit for Approval. Click the Send Email and drag it below the the flUser Fast Lookup. Enter for the Name – Error – Quote Entry Flow – flUser. The Unique Name should be Error_Quote_Entry_Flow_flUser. Copy the Name and enter it into the Subject. This will send an email with the Subject letting you know that there was an Error on the Quote Entry Flow on the flUser element. Since fl stands for Fast Lookup, you know that you need to investigate the flUser Fast Lookup! For the Body, type, “There was a Fault on the flUser element in the Quote Entry Flow. User is {!vUserName} and the fault message is: {!$Flow.FaultMessage}”. Now, click Add Row at the bottom. You’ll see a – Select Parameter – drop down. Select Email Addresses (comma-separated). This is where you need to make a decision. Are you a solo admin? Perhaps you enter in your email address. Do you have a Sales Ops team or an IT team dedicated to Salesforce issues? You might add their team emails. Do you have an email address that will auto create cases for your team to follow up on? Perhaps you can enter their email in. Do you use a Salesforce partner for troubleshooting? Send it to them! Enter in the email address that you would like in the field, if you’re doing this to learn, enter your email address so you see what the emails look like! If you would like to send the email to multiple email addresses, make sure sure to add a comma between them. You are limited to 5 email addresses, so make sure to use them wisely!

Click OK. Now, starting from the flUser Fast Lookup element, connect it to the Send Email element that you just created. You’ll notice now that the line connecting the two elements says Fault. This is to let you know that it is taking the Fault path if something doesn’t work.

Time to learn a new trick! Click on the Send Email element that you just created so that it and only it is highlighted/green. At the top, you’ll see the below icon set to the right of Close.
![]()
They are very helpful buttons! If you want to undo something, click the undo button, the arrow that points left (the darker of the two in the picture). If you undid something and want to redo it, click the redo button, the arrow that points right. If you want to copy something, click the multiple paper icon. If you want to paste something, click the clipboard icon, and if you want to change the Flow properties, click the wrench icon. In this case (with the Send Email element highlighted), you want to click the copy button, then click the paste button afterward. A second Send Email appears!

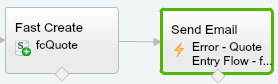
Drag the element to the right of the flOpportunity Fast Lookup. Double click the new Send Email element. This time, have the Name and Subject end with flOpportunity instead of flUser. You’ll want to update the Body notification as well, “There was a Fault on the flOpportunity element in the Quote Entry Flow. User is {!sovUser.FirstName} {!sovUser.LastName} at {!sovUser.Email} and the fault message is: {!$Flow.FaultMessage}”. Click Add Row at the bottom, select Sender Type, and enter {!sovUser.Email} in the field to the right. Your screen should look like this.

Click OK. Connect the flOpportunity Fast Lookup to the Send Email element that you just created.

Select the new Send Email element that you just created, click copy, then paste. Drag the new Send Email element next to the flAccount element. Replace flOpportunity with flAccount in the Name, Unique Name, Body, and Subject.

Connect the flAccount Fast Lookup with the new Send Email element.

Create another Send Email element for fuAccount and connect the fuAccount Fast Update to the new Send Email element.
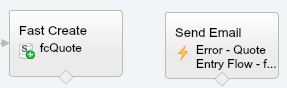
One final Send Email element, this one for fcQuote. Now connect the fcQuote to the new Send Email element. Uh-oh! Do you see the issue?
It doesn’t say Fault! So how do you connect an element that isn’t connected to anything as a Fault? You need to connect it to a different element first! Delete the connection between fcQuote and Send Email.
Next, connect fcQuote to any other element. In this case, the example has been connected to the Update Account Assignment.

Next, connect fcQuote to the Send Email element.

Now, delete the connection between the fcQuote Fast Create element and the Update Account Assignment.

Click Save to Save your Flow. Click Run. You should see the Quote Entry screen. Enter the required information, but don’t fill out the State, and have the Country be United States. Click Next. You may see the next screen, but you’re going to get an email with the Fault! Congratulations, you just sent yourself an email that is much more specific than the email from Salesforce! If you sent it to an email address that creates cases, you’ve created a new case for the Flow fault! Let’s see the two emails from Salesforce. (Note that you didn’t change the URL to add the vUserName, so you won’t have the User information in this example, but if you add ?vUserName={!UserName} you will see who sent you the email!)
Here is the email that Salesforce sent. It’s nice that it says caused by element : FlowRecordUpdate.fuAccount, this lets you know what the element is. Can you find what Flow it is from? This one is a bit tougher, but it’s actually in the first line, “running process Quote_Entry”, a little hidden, but you can see it. Now, who was trying to do the Flow? You don’t know!

Now, look at the email you created. Instead of being sent from Salesforce, it was sent from the User. It clearly lets you know where it came from, if we had used the vUserName information, who the user was and what their email is, as well as the Fault message that Salesforce also shows. If you tied the email to a Case email, you should have a new Case as well! If you have a way to group Cases based on Subject line, you could get these to group together by standardizing the beginning of the Subject line as well!

Now, this will send you a message, but it won’t stop the User and the User won’t know a Fault has occurred. This might be ok with you, however, it might be a little tough for them since they might be looking around for a new record where there isn’t one! How do you fix this? Screens!
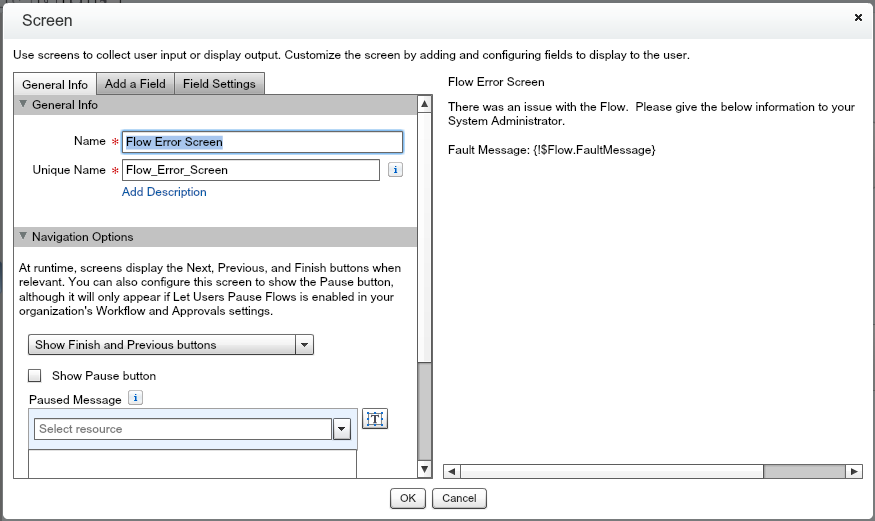
Create a new Screen, Name Flow Error Screen, Unique Name Flow_Error_Screen, uncheck Show Pause Button, and you can leave Show Finish and Previous buttons. Click Add a Field and drag over the Display Text. Type the Unique Name as UserFaultScreen. In the display text area, type:
There was an issue with the Flow. Please give the below information to your System Administrator.
Fault Message: {!$Flow.FaultMessage}
Why this message? Well, if it is urgent, you’ll hear from your User either way. This gives you some information, in addition to the email that you just received. You don’t need the Flow name itself as the User will be able to walk you through what they were doing (and you’ll see the email with more detailed information). The other benefit about the User contacting you is that you might be able to figure out why there was an issue by walking through the steps with the User, especially while it is fresh on their mind! If having a User contact you immediately isn’t possible, perhaps write, “Please give the below information to your System Administrator with the details of what you were trying to do and the variables you entered.” Something like this might help diagnose the issue as well. Of course, it’s up to you, so if your business has a special way to say things, you can add that in, something like, “Uh-oh, looks like something is broken! Time to oil up the robots again! In the meantime, send the man behind the curtain the below message: {!$Flow.FaultMessage}”.
Click OK. Now, connect the Send Email element to the Flow Error Screen.
Now, connect all Send Email elements to the Flow Error Screen.
Save the Flow and click Run one more time. You’ll notice that this time you’ll see the Screen after you enter the information and you’ll get an email, fantastic! Congrats, you’ve learned how to handle Faults in Flows!
A few quick comments:
For anyone worried about too many emails, set up a folder with routing rules on the Subject line to catch all the emails, you can then put all the emails into a single folder automatically to review when you have time with the routing rule.
This method for Fault handling also allows you, if you are currently using a different product for your service team (Use Cases in Salesforce, migrate the team to Service Cloud! 🙂 ), to create a case in that system, if that system uses Email to Case… (Really, start using Service Cloud!)
Some people have suggested creating the Case directly in Flows or posting into a Chatter group. While these are also great ideas and are live in environments, my fear is that the Case won’t get created or the Chatter message won’t post, so you’ll lose out. It could just be an unrealistic fear, but if something is messed up with the Flow itself, trying to create other records after the fault seems a little bit risky to me personally. Again, there are environments that have Cases and Chatter groups working great, so if that is more aligned to your needs (instead of Email to Case), you can do that as well.
All Send Email elements go to the same Screen?! That makes my Flow ugly, it was so pretty! Yes, yes, I know. You can use the copy and paste method and create multiple screens, one for each Send Email element. If you’re looking for beauty, that is the way to go. If you want to manage 1 screen, then you loose some of the beauty of the Flow. Unfortunately for the Send Email, they are all sending a different Flow element, so those need to be unique…
Some of you might be wondering about troubleshooting Flows instead of Fault messages, that will be reviewed in a post in the future. This is the first step to troubleshooting, understanding who, where, and why (the fault message) the error happened in the first place and getting a notification about it.

Thank you! This is great. Especially the trick to make the arrow to email alert say FAULT on “Fast Update”. Spent a day trying to figure that one out. Thanks a bunch!
LikeLike