I saw in the Chicago Salesforce Saturday Trailblazer Community a post about the Accept button in Case Queue Lists not showing in lightning. In case you’re not familiar, when you go to a queue on the Case object (or any object), there is a button on the List View that allows a User to Accept the Case (or other object, like Leads).
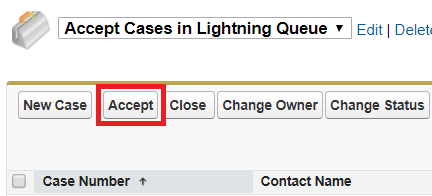
This works in classic, but not lightning, and the post asked for people to vote for an idea for Salesforce to add it (you should go vote here). The first thing I thought, this could be done with Flows! So, here is the declarative solution (with just a very little Visualforce Page to launch our Flow) to help accomplish this in Lightning!
First, we need to create our Flow. We are going to create a new Flow that starts with a loop, then loops through the Cases setting the Owner of the Case to the User who pressed the Accept button. There’s only 1 thing that we need to think about. Since the button will be added to a List View Layout, it will end up on EVERY List View Layout, not just Layouts of Queues (go vote!). We can prevent this from being an issue though by only reassigning Cases where the Owner of the Case is NOT a User. After we assign the Owner, we are going to add the Case to a new List and update all the Cases in the new List. Let’s get started with the Flow.

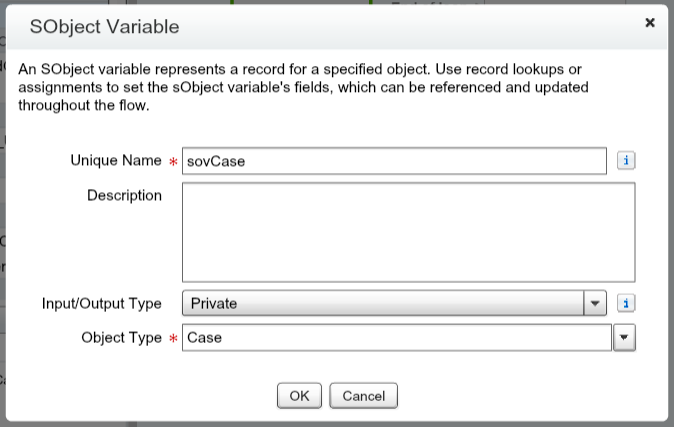
We are going to iterate through a list of Cases (sObject Collection Variable, named socvCases) and have the loop variable be a Case (sObject Variable, named sovCase). We need to have the socvCases variable be an input only variable so that we can pass the Flow in the list of Cases to reassign to a User.

We want the sovCase variable to be set to Private as we don’t want to send in anything to this sObject Variable.
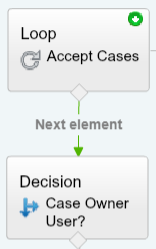
With these two Variables, we can have our Loop to Loop through the Cases.

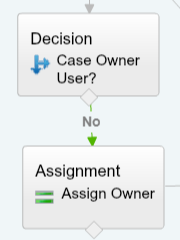
The next thing we need to do is to is create a decision. Is the Case Owner a User? This Decision element will look at the sovCase.OwnerId and see if it starts with ‘005’, which is the first 3 digits for a User. If it is a User, we’ll name it Yes, if not, then No.

The next step is to link the Loop to the Decision.
After this, we need to point back the Decision, Case Owner User?, to the Loop, Accept Cases, if the Decision is ‘Yes’. We DON’T want to reassign a Case if the Owner of the Case is a User, so if the Owner is a User, we’ll just go back to the Loop and move to the next Case (Variable) in the List (Loop) of Cases we sent the Flow.

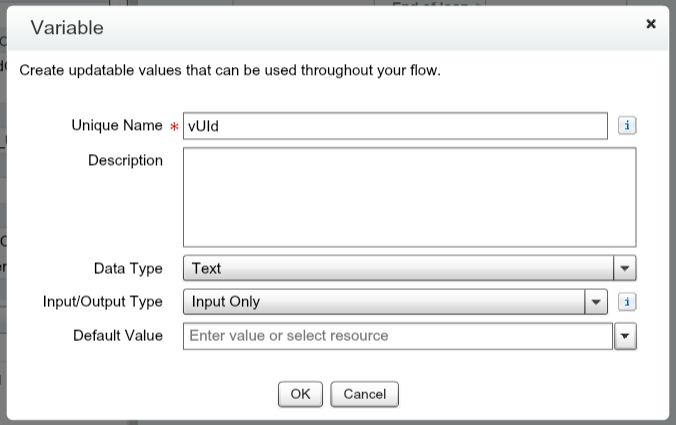
Next, we want to create an Assignment to assign the User that we send to the Flow the Owner to the Case.

In order to do this, we need to create the vUId Variable. This should be an Input Only Variable that will store the User Id.
We want to link the Decision for the Case Owner User to the Assign Owner Assignment if it is no.
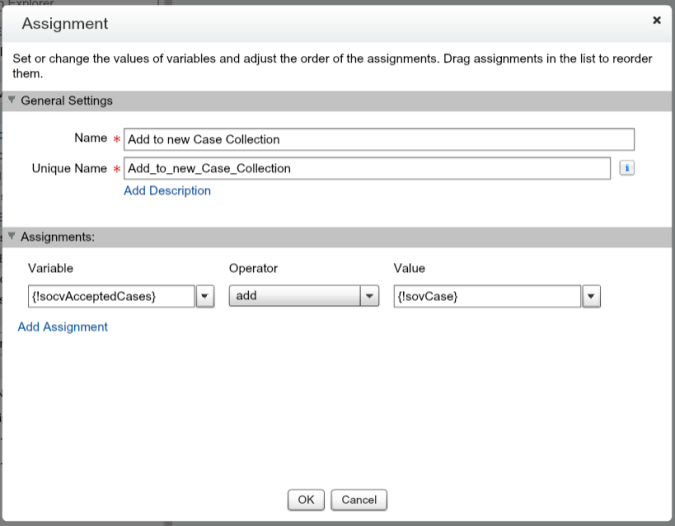
We now need to add the Case to a new list to update. We will need to create a new sObject Collection Variable, socvAcceptedCases, set to Private for this.

We will then add the sovCase to the socvAcceptedCases in an Assignment.
We then need to link the Assign Owner Assignment to the Add to new Case Collection Assignment.

From there, we need to tie the Add to new Case Collection Assignment back to the Loop Accept Cases.

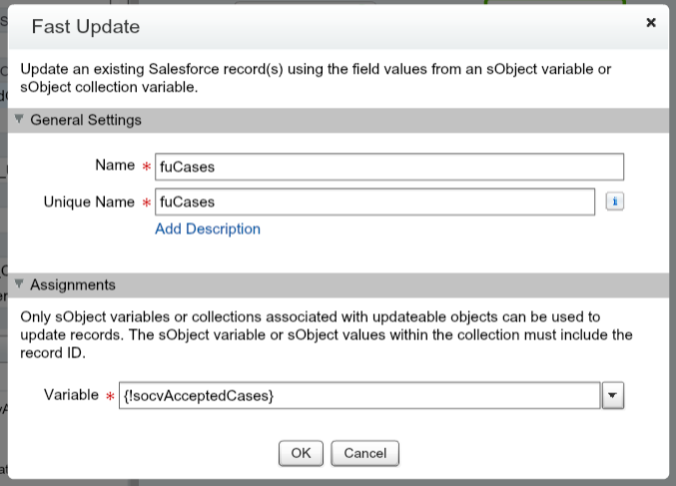
We then need to update the socvAcceptedCases Collection Variable so that the Cases update with the new Owner.
After that has been created, we can then link the Loop to the Fast Update after the End of Loop.
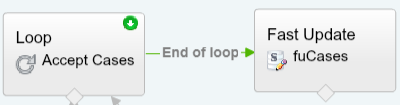
So, we have our Flow! Save your flow (called AcceptCases) as an Autolaunched Flow and activate it after you save it!

This Flow can be used in many places, including calling it from Process Builder. But since we’re trying to show this in a List View, we need a few other pieces. We’ll work on the Visualforce Page next.
So, why a Visualforce Page? Well, we can get the list of Cases (or other object) using the Visualforce Page and sending the information directly to the Flow. Don’t worry, there’s no Apex or Test Classes to go with it, it’s just a very easy shell for the Flow to run in. In order to send the Flow the Cases, we’ll need this page. To make it easy, I’ve provided the code below and an explanation in the code comments so that you can learn a little bit more about it. In a quick overview, we’re using the standard controller for Cases (no code to write!) which will pass the Cases that were selected (you need to have the fields you want to use in the Flow on the page, line 7 we have Id and OwnerId, but they are not rendered on the page) to the Flow and return the User to the Case page. Since adding the button for Lightning on the List View means it shows up in Classic too, we have the finish location change based on if it is Lightning or Classic (or Mobile, just in case).
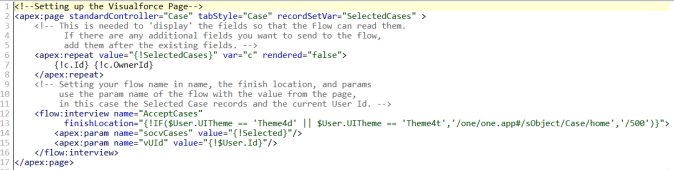
<!--Setting up the Visualforce Page-->
<apex:page standardController="Case" tabStyle="Case" recordSetVar="SelectedCases" >
<!-- This is needed to 'display' the fields so that the Flow can read them.
If there are any additional fields you want to send to the flow,
add them after the existing fields. -->
<apex:repeat value="{!SelectedCases}" var="c" rendered="false">
{!c.Id} {!c.OwnerId}
</apex:repeat>
<!-- Setting your flow name in name, the finish location, and params
use the param name of the flow with the value from the page,
in this case the Selected Case records and the current User Id. -->
<flow:interview name="AcceptCases"
finishLocation="{!IF($User.UITheme == 'Theme4d' || $User.UITheme == 'Theme4t','/one/one.app#/sObject/Case/home','/500')}">
<apex:param name="socvCases" value="{!Selected}"/>
<apex:param name="vUId" value="{!$User.Id}"/>
</flow:interview>
</apex:page>
Ok, now we need to create the button. In Setup, go to Cases, then Buttons, Links, and Actions, then create a New Button. We’ll call it ‘Accept’, make it a List Button, with Display Checkboxes to True, and then make the source a Visualforce Page.

Save the button and then it is time to add the button to the List View Layout! In Setup, go to Cases, then Search Layouts. Click Edit next to the Cases List View. Add in the Accept button that we just created and make sure to uncheck the standard Accept button (since our button can be used in it’s place, don’t confuse Users with two Accept buttons!).

Make sure to add the Visualforce Page to the Profile (or use a Permission Set) to all Users who need to be able to Accept Cases.

Viola! Your button has been created, you’ve allowed Users to use it, you’ve added it to your List View Layout, so you’re ready to go to lightning and use it! Now take it to the next level! What other logic would you like to add? Perhaps set the Accepted Date/Time to a field on the Case so you know when the User Accepted the Case? You can do it in the Flow!
Let me know how it works and what you come up with!

This is great! Unfortunately, I’m encountering errors when trying to create the VF page to build the flow. Is the listed code ready to copy paste? It’s throwing format errors creating a page in Setup, and not saving in the Developer Console.
LikeLike
Unfortunately, I don’t have a code block widget, so I’m not 100% sure if the copied code will work. The code in the screen shot is how it should be to work, if you can copy from there. I’ll work to get a code block on the site soon.
LikeLike
Managed to get it to work just typing in. This is great, thank yoU!
LikeLike
You’re welcome, glad it is working!
LikeLike
Hi Sarah,
I just tried to make an update to the code area. It should copy correctly now.
Rich
LikeLike
Thank you for sharing great article related to salesforce. i want to contribute a article related to salesforce. how can i do please guide me.
LikeLike
Hi Manchun,
Thank you! I’m not sure on how to submit an article to Salesforce, I have never been featured on their blog.
Rich
LikeLike
You actually make it appear really easy along with your presentation however I in finding this topic to be actually one thing which I believe I might by no means understand. It sort of feels too complex and very large for me. I am taking a look forward for your subsequent submit, I will attempt to get the cling of it!
LikeLike
Hi Alex, have you looked through some of the other posts prior to this one? There are a few posts that go over the “basics” that might help you to understand this post a bit better once you learn the content in those. I’m sure you can learn it!
LikeLike
you’re in reality a excellent webmaster. The web site loading pace is incredible. It sort of feels that you’re doing any distinctive trick. Furthermore, The contents are masterwork. you’ve done a excellent process in this matter!
LikeLike
Thanks Alex!
LikeLike
Thanks Richard.
It’s work good!
LikeLike
Wow, this was really helpful. I do okay with flows, but my visualforce knowledge is scant. Your code snippet saved the day. Thank you for sharing! I’m very interested to see what’s on the rest of your site now.
LikeLike
In Lightning after clicking the button – it updates records and navigates users to ‘recently viewed’ list view, is it possible to keep him on the existing list view from which user clicked the button ?
LikeLike
Hi Pg,
It should be possible, but it will take some extra code to do.
LikeLike
I got the solution , I’m using extension and in the constructor of it getting the current page ‘filtername’ – which is the id of the list view and on finishLocation of flow redirecting user back to above retried listview id.
Constructor is something like this :
public CasesController(ApexPages.StandardSetController standardController)
{
String retURL = ApexPages.currentPage().getURL();
String s2 = retURL.substringAfter(‘filterName%3D’);
String s3 = s2.substringBefore(‘&’);
pageA = ‘/lightning/o/Case/list?filterName=’ + s3;
}
LikeLike
That is great, thanks for sharing Pg! I’m sure others will like to use this as well!
LikeLike
What if I have to open case in New Tab? (After it is assigned)
How to implement the functionality: users should not be able to open cases until it is assigned to them.
LikeLike
Hi Vishwas,
If you’re looking to assign cases to users and have them open them in tabs, I’d highly recommend the Service Console and also using Omni-Channel for case assignment and routing.
LikeLike
On click of Accept Case I just want the case to open in a new tab. That’s it. How can this be done? I am trying with extension controller but I have failed in achieving the results
LikeLike
Hello Rich,
Thanks for detailed explanation on Accept Button for Cases.
I’am trying to do the same with Leads, but don’t see any button on List view in Lightning.
I have updated the finishLocation=”{!IF($User.UITheme == ‘Theme4d’ || $User.UITheme == ‘Theme4t’,’/one/one.app#/sObject/Lead/home’,’/00Q’)}”>
Perhaps sometimes is missing for Leads accepted Button ?
Could you help me ?
PS: I added on all profile the Visualforce Page permissions on Accept Leads.
LikeLike
Hi David,
To have the button show up, the first check that your button is on the Lead Object and is selected as a List Button, not a Detail Page Button. After that, in Setup, go to the Lead Object, then to Search Layouts. You’ll see the Leads List View. Click edit and then you should be able to select your custom button. I hope that helps!
Rich
LikeLike
List view button not visible in Lightning please help…!!
LikeLike
Make sure to refresh a few times, lightning does cache. After that, make sure to check in setup for the list view button settings.
“In Setup, go to Cases, then Search Layouts. Click Edit next to the Cases List View. Add in the Accept button that we just created and make sure to uncheck the standard Accept button (since our button can be used in it’s place, don’t confuse Users with two Accept buttons!).”
LikeLike
Is there a way to display error message if the users don’t select any records from the list view?
LikeLike
Hi Shweta,
There are probably a couple options. The first option is in your flow, check to see if the list is null. If it is, display an error message in a screen element and allow them to go backwards, but not finish. Alternatively, you could update the Lightning Component to “take over” the navigation and by doing so, you would be able to do a check in the component helper to see if things were filled out and if not, not allow the click to next to work and display an error in the lightning component. Check out this link for the developer notes on Lightning Components controlling the Flow navigation. https://developer.salesforce.com/docs/atlas.en-us.lightning.meta/lightning/components_config_for_flow_screens_navigate.htm
LikeLike
I was able to achieve this by passing additional parameter to the flow:
and then checking in the flow for the value of this parameter.
LikeLike
Hi Rich,
Thank you for this great post. Do you have a solution for the Accept button on the detail page where users can assign cases to themselves on the record?
LikeLike
Hi G H,
You can do the same idea with a page button. There is a blog post on launching a flow with a button, if you combine that with this flow logic, you should be able to get to your solution!
LikeLike
I am getting this below error, can you please help me out.
Error:
java.lang.reflect.InvocationTargetException
Error is in expression ‘{!interviewDisplay}’ in component in component interview.apexc
Code:
LikeLike
Does this still work in Winter ’20? Trying to do this in a Sandbox and we can get the button to appear in Classic but not in lightning. Very much an ‘argh’ moment.
LikeLike
Hi Matt,
Great question! I just checked my developer org and I don’t see it there either! There is a possible new solution, you can now create mass quick actions. I suppose I need to create a blog post for this one, but if you create a quick action for update record on case and only and the Case Owner field to the quick action, you can then add the quick action to the list view. Check out the Salesforce documentation on it. https://help.salesforce.com/articleView?id=mass_quick_actions_create.htm&type=5
Rich
LikeLike