This blog post was originally called, “Add in a Price Book selection in the input Screen”. That title doesn’t do justice for Dynamic Choices, so the title has been updated to, “Find Related Records and Have Users Select Them in a Screen”. The goal with this post is to understand how Flows can be related to different records and be able to select records through a pick list of dynamic choices. This means that you are able to connect and update records beyond the record the User is working on as well as let Users pick which records they want to associate or update. That is powerful stuff! You’ll learn more about the full power of Flows and updating related records as you continue to learn through the Learning Flow series, but this post will be focused on finding those related records and allowing Users to select them. Time to get started!
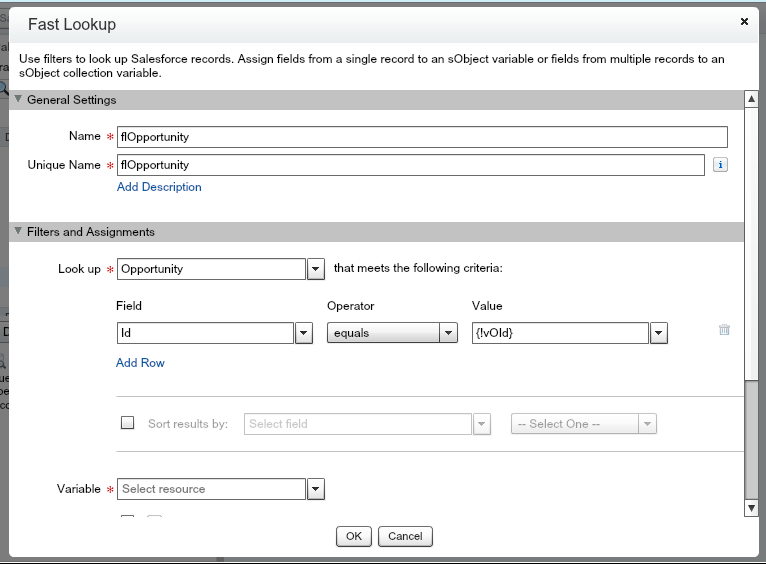
Open up the Flow that you created in Create an Input Screen for Users, Assign Variables, and Create a Quote – Learning Flow 1.A. The business liked your original Flow but would like for users to be able to add a Contact from the Account into the Quote so the business knows who the Quote is for as well as have Users select a Price Book based on security restrictions. To start, you’ll need to find the Account Id. With your Flow open, drag a Fast Lookup element onto the Canvas to the right above the Quote Entry Screen. Name this Fast Lookup element flOpportunity, which stands for Fast Lookup Opportunity, for both the Name and Unique Name. In the Filters and Assignments section below, Look up Opportunity. When you do, that, you’ll see more fields pop up for you to fill out.

In the Look up section for Opportunity, under field, find Id. Set the Operator to equals and the Value to vOId, the variable of Opportunity Id that you created previously. Since Salesforce Ids are unique, this is the only thing that you need to be able to look up the Opportunity. Since you will not have multiple records using Ids, there is no reason to sort results, so there is no need to click the Sort results by checkbox. You’ll be doing that soon enough with your Contact look up. For now, your screen should match the below image.
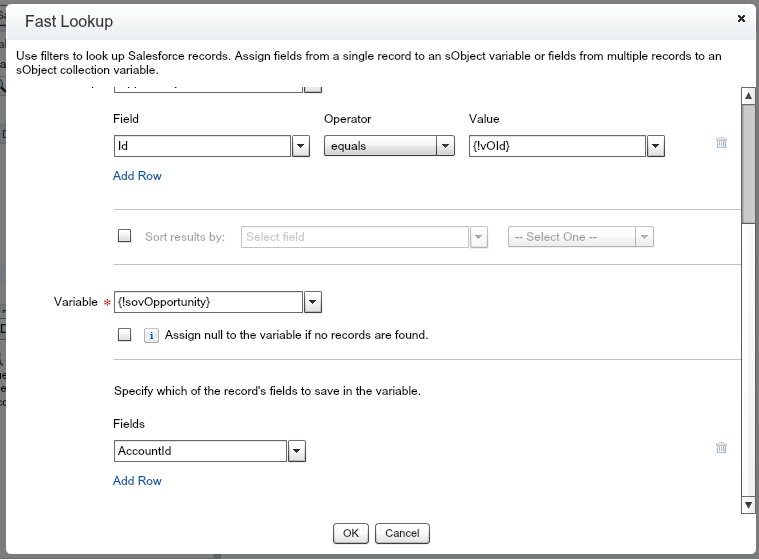
For the Variable, you’ll need to create a new sObject Variable. To do that, click the drop down arrow, create new, then sObject Variable. For the Unique Name, enter sovOpportunity (for sObject Variable Opportunity), in Description enter, “The related Opportunity of the Quote”, set the Input/Output Type to Input and Output, and the Object Type as Opportunity.

Click OK. {!sovOpportunity} should now show as the Variable in your Fast Lookup element. You’ll work with the “Assign null to the variable if no records are found” later, so for now keep that unchecked. In the Fields section, select AccountId. You don’t need any other fields from the Opportunity right now, so for now you should be done.
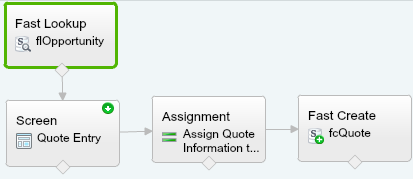
Click OK and you should be back to the main Flow screen. Click the diamond at the bottom of the Fast Lookup flOpportunity and drag to the Quote Entry Screen.
Now that the related AccountId has been looked up, double click on the Quote Entry Screen. Click Add a Field and drag the Dropdown List below Expiration Date. Click on [Dropdown List] and enter Quote Contact into Label. Unique Name should be Quote_Contact. Keep the Value Data Type as Text.
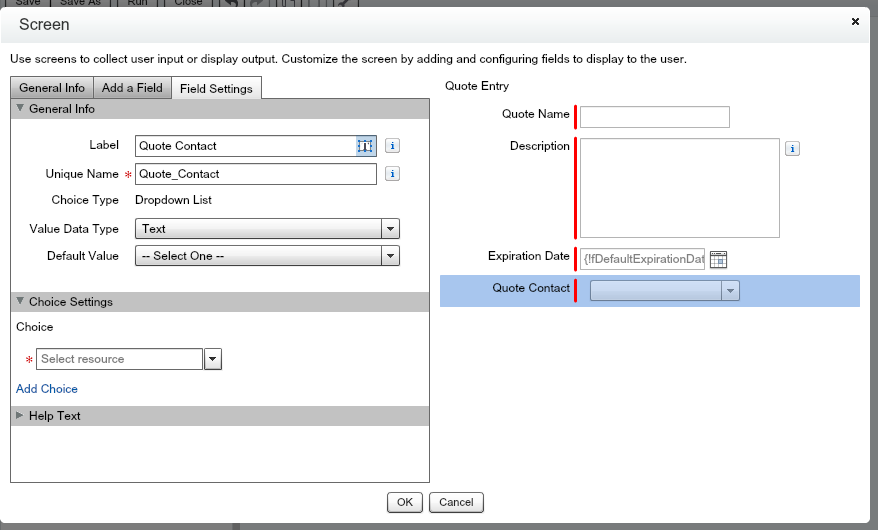
Click the drop down arrow in the Select Resource field of the Choice Settings section. Select Create New, then Dynamic Choice. For the Unique Name, enter Contact_Dynamic_Choice. Value Data Type should be Text. Click into the field for Create a choice for each and start to type Contact. Select Contact. (This means you are searching for Contacts) New fields should appear for you to fill in.
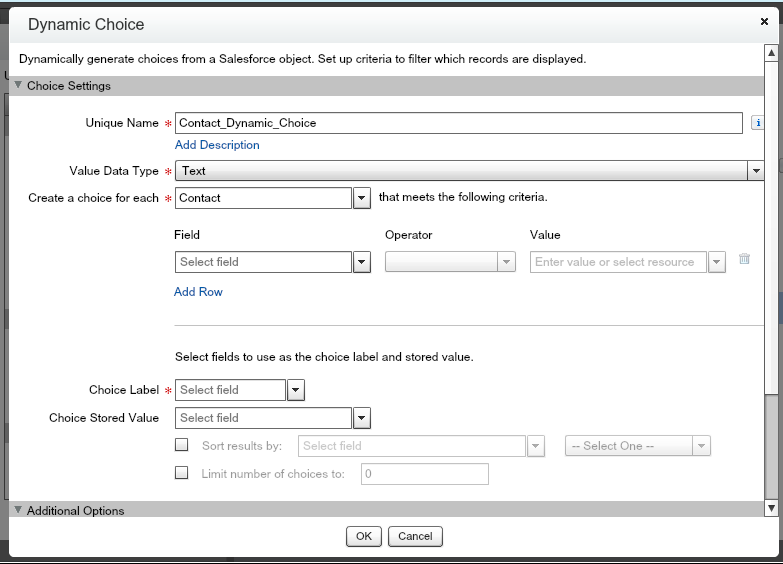
In the field section, start typing Account and select AccountId. (This finds all Contacts with the AccountId in the Value area, which will be the Account related to the Opportunity) Operator should be equals. In the value section, click the drop down arrow. Select sObject Variables, then select sovOpportunity, then select AccountId. You can also type sovOpportunity.AccountId and the system will search for all variables with that name. In Choice Label, type Name and select Name. (This is what the User will see in the pick list) In the Choice Stored Value, select Id. (This is the value that the system will use) You’ll want to sort the results for the users, so check the Sort results by check box. For field, enter Name and select Name, then where it says, “– Select One –“, click the drop down and select Ascending so that the names appear from A-Z. You’re not looking to limit the results, so don’t worry about checking that box. So far, your Dynamic Choice screen should look like the below image.

In additional Options section, you’ll want to assign the variables from the Contact to the Quote. Start with Id, enter Id in the field and select the Id. In the variable, type ContactId and select the ContactId for sovQuote.ContactId. The variable should be {!sovQuote.ContactId} after you select it. Click Add Row. In the next field entry that popped up, type Email, then in the variable section, type Email again. Select the email of the sovQuote, your variable should show {!sovQuote.Email}. Click Add Row one more time to add the Phone of the Contact to the Quote. Type Phone in the Field and select Phone. In the variable, type Phone and select the Phone field in the sovQuote variable. The variable should show {!sovQuote.Phone}. With all the fields filled in, your screen should look like the below image.

Click OK. You should see your User Screen element now with the {!Contact_Dynamice_Choice} filled out in the Choice section.

Click OK then save your flow, it’s important to constantly save your work! You’ll notice the Save failed. This is because you activated your Flow in Part 1.A. Don’t worry, this is a good thing! This allows you to save different versions of your Flows and track the changes. Click OK in the Save error popup and then click Save As. Keep “Save As” as New Version. (If you wanted to copy/duplicate the Flow, you would select New Flow) Change the v1 in the Name to v2 so the Flow Name should be Quote Entry v2. In the Description field, enter a note for the future, something like, “Added a Fast Lookup for Opportunity and a Dynamic Choice pick list for Contact.”

Click OK. You should see a Save successful with a General Warning, “flOpportunity (Fast Lookup): The section of the flow starting from ‘flOpportunity’ is never used.” Click OK. The reason for the warning is because your start element is the Quote Entry Screen, you need to change the start element to the Fast Lookup element for flOpportunity. Click the Green circle with white down arrow in the Fast Lookup when you hoover over Fast Lookup. Now click Save. Since you haven’t activated this version of the Flow yet, there is no need to change the name. Your flow should look like this.

Time to see what it looks like for Users. Select a test Opportunity and copy the Id. Using the URL hack from Part 1.A, click run on your Quote Entry Flow and add ?vOId={!Opportunity.Id} to run your flow. Fill in the information with what you would like to see. As an example, there is a screen shot of the Quote Entry Screen below. If there are multiple Contacts tied to the related Account of the Opportunity, you should see them appear in the drop down.
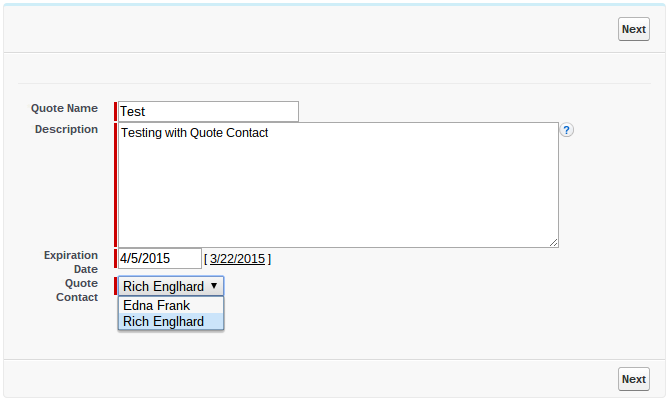
Click Next and complete the Flow. When you go to the Quote that was generated, you’ll see the Contact you selected, their Phone number, and Email. Congrats! The last thing the business would like is for you to add a Price Book selection based on permissions. To do this, you’ll learn about Custom Settings! BONUS!
As the main part of this is Flows, you won’t spend too much time with Custom Settings, just enough to understand the basics and impact your Flow accordingly.
First, go to Setup and in the Search All Setup area type Custom Settings. Click New. Type the Label and Object Name as Permissions. Setting type should be Hierarchy as you’ll need to segment everything by User. For Visibility, select Public. In Description, type, “This custom setting will allow the organization to give different permissions to different users.”

Click Save. Click New in the Custom Fields section, then select Checkbox. Type in Non-Profit Price Book into the Field Label. Select Next and then click Save. You should see in your Custom Setting Definition something very similar to an object with Custom Fields.

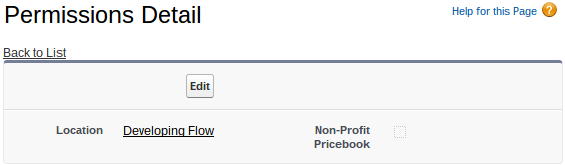
Now select Manage (next to Edit and Delete). You should see two New buttons. Click the New button above Default Organization Level Value first. Keep Non-Profit Price Book unchecked as the default ability to create a Quote with this Price Book is False. Click Save. At this point, you’ll see Permissions Detail, click the Back to List hyperlink below it.
Now, you should only see one New button. Click the New button above Setup Owner. For the Custom Setting, you need to select a Profile that you would like to have the permission to create a Quote with a Non-Profit Price Book. In this case, select System Administrator and then check the Non-Profit Price Book checkbox. Click Save.

Click Save then Back to List. You’ll see that System Administrator is now under Setup Owner. If you click on View next to System Administrator, you’ll see Non-Profit Price Book is checked. Great, this is step 1 for Custom Settings! Step 2, go to the Price Book tab. (You might need to click the + in the tab bar to get to all tabs) Check to see if you have Price books by selecting All next to View: and then Go!. Looks like a development environment has 2, Standard and Standard Price Book. You need to add one more. Click New Price Book. In Price Book Name, enter Non-Profit, check the Active box, and click Save. There are no Products, so you’ll need to add one. In the Products related list, click Add and select a product. For the development environment, select the box next to SLA: Bronze, and then click Select at the top. Click the box for Use Standard Price and then click Save. Now, there is one final task. Copy the Price Book Name and then click on Setup. Type Price Book in the Setup Search bar and select Fields under Price Book. It’s time to add a new field to Price Book Fields. Click on the New in the Price Book Custom Fields & Relationships section. Select Formula then Next, in the Field Label, Type Permission to Quote, then select Checkbox as the Formula Return Type and click Next. For the Formula, you need to say, if the Price Book is Non-Profit, then you need to check the Custom Setting, if not, then True. You can get more complex in your Salesforce organization, but for this training, that should get across the power of Custom Settings and Flows. If you haven’t figured out what the Formula should look like, it should look like (Notice that in the organization I used, I wrote Pricebook, not Price Book. If you used Price Book, then and a _ between Price and book in the formula below.)
IF( Name = “Non-Profit”, $Setup.Permissions__c.Non_Profit_Pricebook__c , True)
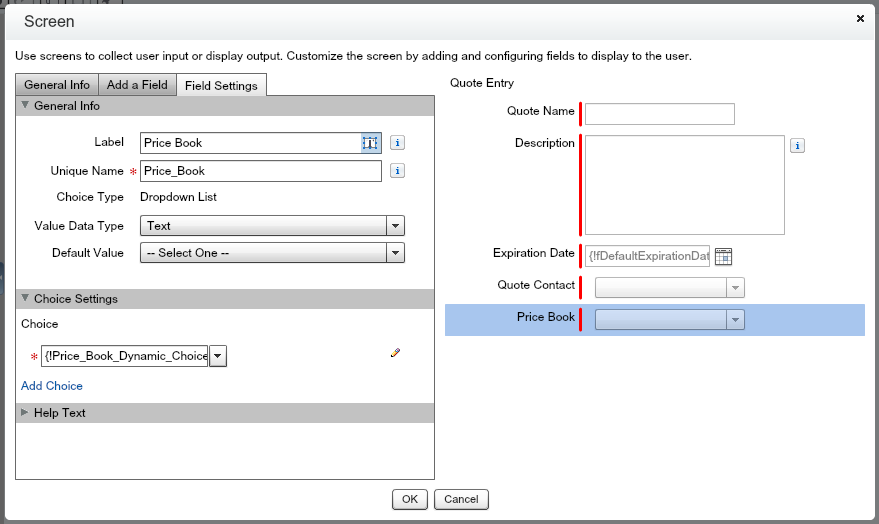
The Custom Setting will either be True or False based on the profile that you selected when creating the Custom Setting, so in this case, only System Administrators will have the Permission To Quote checked for the Non-Profit Price Book. Click Next and then Next again and click Save to Save the new field. Ok, now everything is set up for your Flow. Go back to your Flow. Open the Quote Entry Screen. Click on Add a Field, then drag over Dropdown List and click [Dropdown List] to open the Field Settings. For the Label, type Price Book. So far, you should see the below image for the Screen.

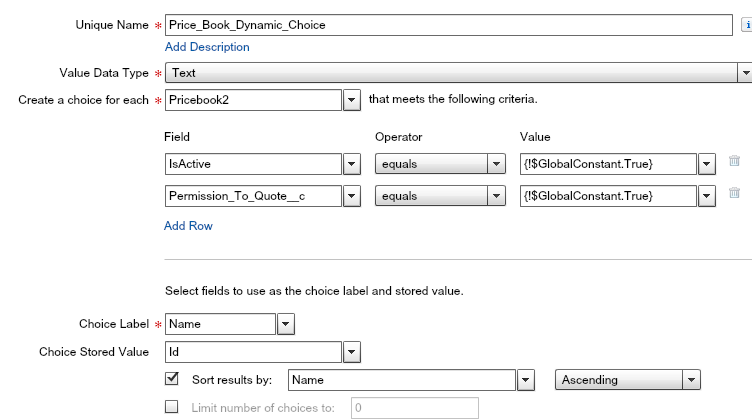
In the Choice Settings area, click the drop down arrow for Select resource. Click Create New, then Dynamic Choice. For Unique Name, type in Price_Book_Dynamic_Choice. Keep the Value Data Type as Text, then, in the Create a choice for each, select the object as Pricebook2. For field, type Active and select IsActive, for Operator, select Equals, and for Value, type True and select $GlobalConstant.True. The value should show {!$GlobalConstant.True}. Click Add Row and type in Permission, select Permission_To_Quote__c, then for Operator, select Equals, and for Value, type True and Select $GlobalConstant.True. For Choice Label, type name and select Name. For Choice Stored Value, type Id and Select Id. Check the box for Sort results by: and then in the Select field area type Name and select Name, then for “– Select One –” select Ascending. So far, your screen should look like this.
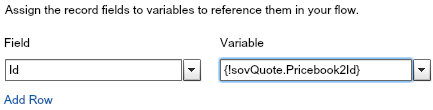
In the Field section, type Id and select Id, in Variable section type quote.Price, and select under sovQuote, select Pricebook2Id. The variable should be {!sovQuote.Pricebook2Id}.
Click OK. You should see the User input Screen information again. The Choice field should be {!Price_Book_Dynamic_Choice}.
Click OK. Then click Save. Click Run and add ?vOId={!Opportunity.Id} after the URL. The Price Book is now there!

Final test. Go back to Setup and to Custom Settings. Click on Manage on the Permissions Custom Setting. Click Edit next to System Administrator. Uncheck Non-Profit Pricebook and click Save. Go back to the Flow, click Run, and add ?vOId={!Opportunity.Id} after the URL.

Now you only see the Standard Price Book! Congratulations! You’ve just created two Dynamic Choice lists, one to add Contact records to a Quote and one to select a Price Book if the User has the proper permissions, and you also learned how to use Fast Lookups to find field information within a Record and use it to find Related Records! You’re on your way to mastering Salesforce Flows!
UPDATE: A written example: After this post, I still feel like the need to write more on this. Having related records in a screen in a pick list is amazing! Although this part won’t be visual, imagine this. If you have a custom object, say Shipping Addresses, you could have your User select from a list of Shipping Addresses what the Shipping Address for the Quote will be, without writing code! Amazing!

Hi Rich,
My use case is selecting Opportunity Products. I would like to be able to use the multi-select checkboxes on the Opp Product related list and bring the selected items into a Flow. Any idea if that’s possible or not? The other option would be to bring all of the Opp Line Items into the Flow and allow the User to select the desired line items. This is less desirable because there can be a lot of line items and Flow is not the best for displaying large lists.
LikeLike
Hi Emmett,
In part 2 of the Learning Flow series, I’ll cover quote line items, which are very similar to the opportunity. It will be more like your second option, but Users will only see products in the related price book that they chose in the quote.
LikeLike
Hi Rich,
How would I go about starting a process that simply copies all the opportunity line items over to a quote that been created from a previous process builder? No need to screens or wizard, since it should happen automatically in the background.
LikeLike
I would really like to see ” If you have a custom object, say Shipping Addresses, you could have your User select from a list of Shipping Addresses what the Shipping Address for the Quote will be, without writing code!”
LikeLike
Hi Jerry,
Are the Shipping Addresses tied to where you are shipping from or are they shipping addresses for a client where you are selecting where to ship to? Either way, you could do this with dynamic lookups. (Are the Shipping Addresses uniquely tied to the account record in either case?)
Rich
LikeLike
“…Since you will not have multiple records using Ids,…” Iam trying the FastLookup output as Collection and trying to find a way to map it to dynamic choice through variable.Is it possible?Iam struck
LikeLike