This is the first post for the Learning Flow series to learn how to write and use Salesforce Visual Workflow (Flows) and the first post for Part 1, Main Quote Information, where you will learn how to use the Fast Create element, Screen element, and Assignment element in Flows. You will also learn about sObjects and Flow Validation (similar to Validation Rules, but with one BIG difference). You’ll create an input Screen for Users to enter information about the quote, Assign Variables to the quote from the inputs of the User, and create the quote.
Since this is the first part of Part 1 of the Learning Flow guide, you may need to set up quotes. If you have a new developer instance or are testing in your sandbox (always test before sending to production!) and you haven’t turned quotes on, go to the Setup menu, click on Quote, and click Settings. Enable Quotes and append Quote Related Lists to the Opportunity Page Layouts that will need to see Quotes.
OK, now that Quotes are set up, start by creating a new Flow. After you open your Flow, drag the Screen element from the Palette into the canvas on the right. Name the Screen, “Quote Entry”, and let Salesforce automatically create the Unique Name by pressing tab. Since you will have the Flow continue on to another element after this screen (Assignment element), you want to change the Navigation Options from, “Show Finish and Previous buttons” to “Don’t show Finish button”. For now, also uncheck the “Show Pause button”.

You want to check with your Users and Management to find out what the requirements are for gathering data and creating quotes. For this lesson, you want to have the User enter in a Description, pick an Expiration Date for the Quote, Name the Quote and finally set the Status to Draft. To start, click the Add a Field tab at the top of the Screen element area next to General Info. Since you’re looking for the User to enter a Description and the standard field length is 32,000 for Description (at least in my development environment!), go ahead and double click on Long Text Area. You’ll notice that it popped up on the right under where it says, “Quote Entry”, the Name of your Flow. You can also click on an Input, Choice, Multi-Select Choice, or Output and drag it to the right where [Long Text Area] appeared. These are the two ways to add to your Screen element. Now that [Long Text Area] has appeared on the right side, go ahead and click on it. You should see the below part on your screen.

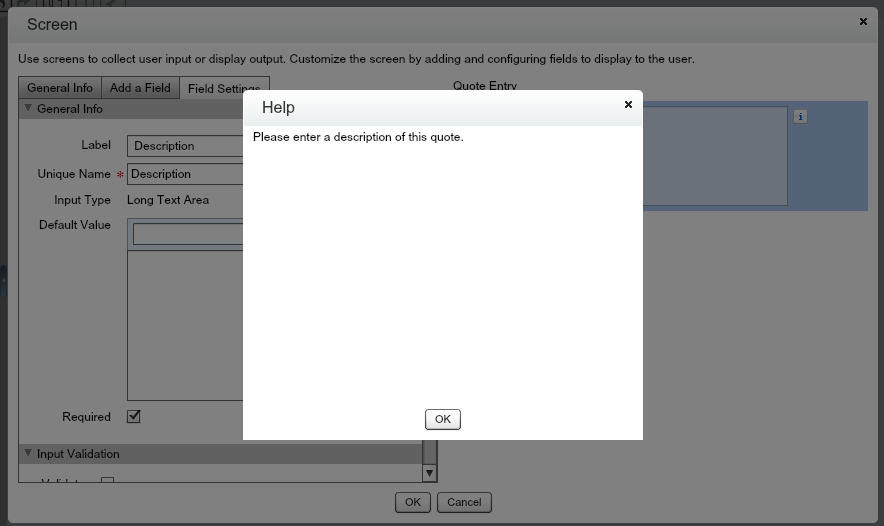
For the Label and Unique Name, enter “Description”. You’ll learn about Default Values later, so for now skip that and check the box Required since this is a requirement for the Quote. If you continue to scroll down past Input Validation (leave the Validate box unchecked), you’ll see Help Text. It’s nice for Users to understand what/why they are entering information, so click the arrow next to Help Text to reveal the Help Text box. You might have seen the Select Resource part of the box in the Long Text Area Default Value place. You’ll review that soon. For now, in the main text area of Help Text, enter, “Please enter a description of this quote.” If you look to the right where [Long Text Area] was, you should now see that it says Description, shows a red line signaling that it is required, and has an information box next to it. Click on the information box (the little box with an i). You should see the below image.
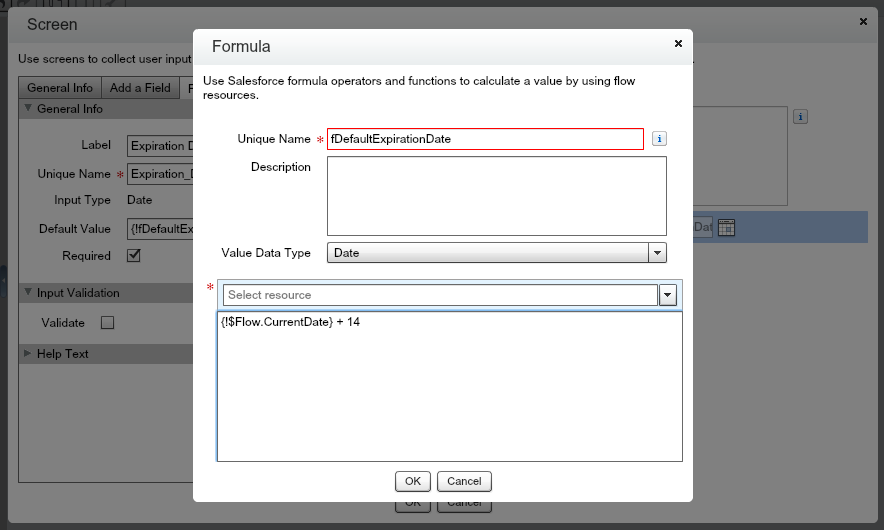
Click OK and return to the Screen edit screen. Click on Add a Field and drag over the Date Input. Click on [Date] and enter Expiration Date as the label. Mark this as a Required field. The business rules also say that the Expiration Date should be 2 weeks or less from the day the quote was created until the quote creation date. To help Users out, you want to set the Default Value to Today +14 days (two weeks). To do this, click the drop down arrow on the Default Value input field. Click Create New, then Formula. Enter the Unique Name as “fDefaultExpirationDate”. The f stands for formula and is helpful in the future when you need to reference variables from one Flow to another, so keeping the Unique Names tied to their elements is important for clean app building! You’ll get two more examples later on in this post. Select the Value Data Type as Date. You’ll see an input field with “Select resource” in it. Click the down arrow and select System, then $Flow.CurrentDate. This will give you the… current Date! If you’re familiar with Salesforce formulas, you might be used to TODAY(). This is the Flow way of saying Today. Now, add a plus sign and 14 to complete the formula to look like, “{!$Flow.CurrentDate} + 14”. It should look like the below image.
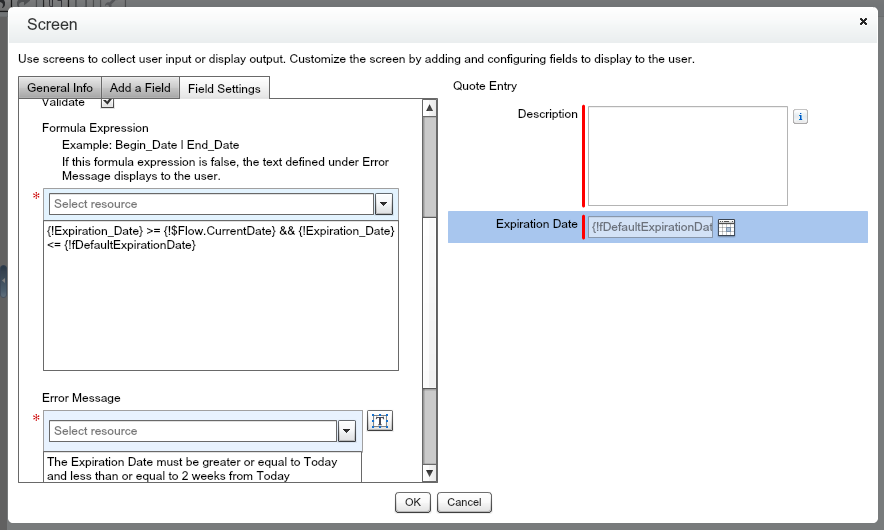
You’ll notice that Default Value is now showing the formula you just created! Since the business rules say the quote should be the Default Expiration Date or less until the quote creation date, you need to Validate this field. Check the Validate box. Below you’ll see a new Formula Expression area.
***IMPORTANT*** The Validation for Flows is the OPPOSITE of the Validation Rules on the standard Salesforce Validation Rule settings. For Flows, if the Formula Expression is FALSE, then the Validation will stop the User. You’ll need to think the other way for Flows. ***IMPORTANT***
For the formula, you need to use the Unique Name from the Date field. If you start typing Expiration_Date, you’ll notice that it doesn’t come up. This is (I think) a bug from Salesforce. To get around this, uncheck Validate, then click OK to close the Screen. Now double click on the Screen element in the Canvas. Once the Screen element is open again, click on Expiration Date to go back to that field. Now click on Validate and start typing Expiration_Date in the Select resource area. You should see fDefaultExpirationDate and Expiration_Date. Select the Expiration_Date under Screen Input Fields. After {!Expiration_Date}, you want to make sure the Expiration Date is greater or equal to today ({!$Flow.CurrentDate} for Flows!) and Expiration Date is less than or equal to {!fDefaultExpirationDate}. The formula should be “{!Expiration_Date} >= {!$Flow.CurrentDate} && {!Expiration_Date} <= {!fDefaultExpirationDate}”. For the error message, you’ll want to let the User know that “The Expiration Date must be greater or equal to Today and less than or equal to 2 weeks from Today”.
That should be all you need for the Validation. If you would like to add Help Text, add it now.
With the Expiration Date done, you now need to add one more field, so click back on the Add a Field tab. **You might be thinking, wait, one more field, but I have Quote Name AND Status left! That is correct, but the status should always be Draft, so you can set that without having to show it in the screen!** From the Add a Field tab, drag and drop the Textbox Input to the area on the right and place it above Description but below Quote Entry. When you drag and drop an Input or other field type, you can place it in the Screen where you want! Your [Textbox] field should be the first field in the Screen which will be the first field the User enters. Click on [Textbox] and enter the label as Quote Name and click tab, Salesforce should auto-fill in the Unique Name as Quote_Name. Check Required (add Help Text if desired) and then click OK on the Screen Element. You should now see your Screen, Quote Entry, on the Flow canvas. A little lonely, no?! You’ll add more soon, but now is a good time to Save your Flow! On the top left corner, you’ll see the Save button. Click it, enter the Name as Quote Entry (Unique Name of Quote_Entry). After that, go back to the name and add v1 so the Name shows Quote Entry v1 as this is the first version of the Flow. Enter a description for v1, Created Flow with a Screen element for Quote information and Assigned the information to the Quote Variable and Created the Quote. This gives you reference for the future, which it might be a little much for V1, but as you’re going through v2, v3, v4, v5, etc., it’s REALLY nice to be able to see the description for each version, what you may have added or changed. Now click OK to save the Flow. You’ll see your Save was successful, but you have 2 warnings.
***Activation Warnings (1) – Until these are fixed, you can’t activate your flow.
***General Warnings (1) – These range a lot, but the one you see right now is “Quote_Entry” is not connected to anything. There might be a Flow where that is ok (check out the Update a Record Through a Button and Salesforce Flow post), but for this Flow, that would cause an issue. So it’s time to add the Assignment Element!
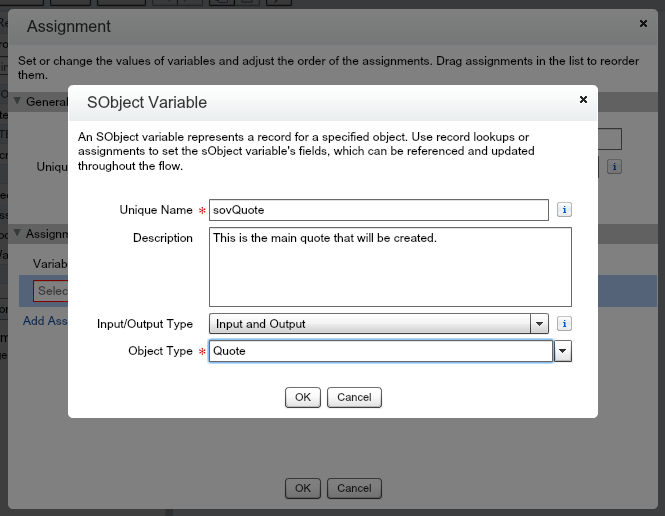
Drag the Assignment element to the Canvas and drop it to the right of the Quote Entry Screen. Name it, Assign Quote Information to Quote. That brings you to Variable. Click the drop down arrow, then Create New, then select sObject. (Some might say, you can do this directly with a Record Create object and skip Assignment. This is true, but you are going to be growing your Flow and the sObject will be needed later on. It’s important as you build your Flows to think ahead to the end goal to see what you should use to build with, Record Create/Update/Delete or Fast Create/Update/Delete. Think of an sObject as the full collection of the Object you’re interacting with, in this case Quote, instead of just a Variable of the Quote, like Expiration Date) Since this is an sObject Variable, shorten that down to sov and start the Unique Name for all sObject Variables as sov. Since this is a Quote, enter the Unique Name as sovQuote. Enter in a description for your sov. Now you get to Input/Output Type. By default, I typically recommend select Input/Output Type. That simply means you can set variables going into the Flow or leaving the Flow (such as a subflow!). You’ll be using that for sovQuote, so set the Input/Output Type as Input and Output. The Object Type should be Quote. To make sure you’re on track, your screen should look like the image below.
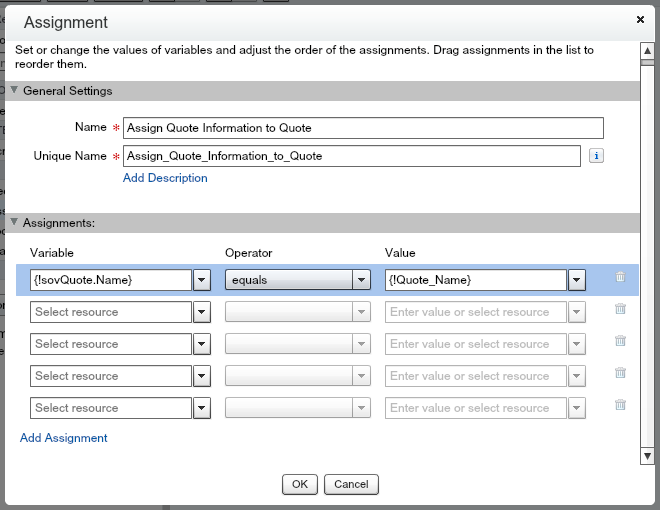
Click OK. After you add a new sObject Variable in the Variable area, it will include the FULL sObject. This is not what you need, so delete the{!sovQuote} and search for sovQuote.Name. Select Name under sObject Variables, then under sovQuote in the Variable input field. For the Operator, select Equals. For Value, click the drop down arrow, then Screen Input Fields, then Quote_Name. You need to add the other two input fields from the Screen and set the Status to Draft. You’ll also need to tie the Quote to the Opportunity (every quote needs to be tied to an Opportunity, standard Salesforce requirement), so click Add Assignment below the Variable input field 4 times.
Next, Select Resource, sovQuote.ExpirationDate. If you enter e.Date into the Variable, the system will search for the sObjects with e in the name and the fields of those sObjects with Date in the field name. In this case, you’ll see the ExpirationDate under sovQuote. Select equals and the value should be the Screen Input Field Expiration_Date. Don’t select the sovQuote.ExpirationDate or the fDefaultExpirationDate!!! Only the Expiration_Date from the Screen Input Fields section! Now set Quote Status Equal to Draft. You can select Draft from the Picklist section (auto added below System) of the drop down arrow in the Value column to see all the Picklist values for the Status field of Quote! Set the Quote Description as the Screen Input Field Description. Finally, to set the Opportunity, you need to select sovQuote.OpportunityId, select equals, then in the Value field select the drop down arrow, Create New, then Variable. To get the Opportunity Id, you’ll need to send it to the Flow from a button, Process Builder process, Visualforce Page, etc. Start the Unique Name with a v for Variable. Name it vOId for Variable Opportunity ID. Keep the Data Type as Text, Select Input and Output for Input/Output Type, and leave Default Value blank.

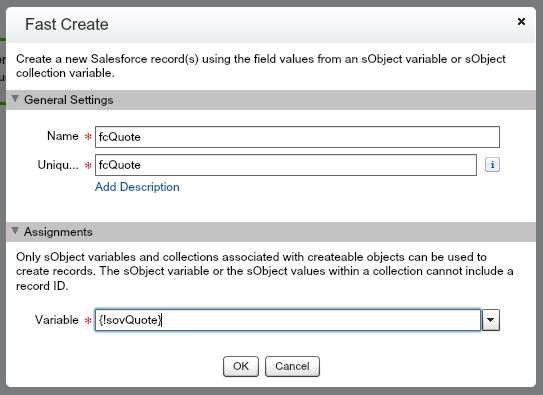
Click OK. The vOId variable should auto-fill in. That should take care of the Assignment. Click OK and click Save to make sure your hard work is saved! Don’t worry about the warnings, you’ll get to that at the end. The last element you’ll from the Palette in this post is the Fast Create element. (found in the Data section of the Palette) Drag that and drop it to the right of the Assignment element. Name it fcQuote for Fast Create Quote. Select the sovQuote Variable in the Variable lookup section.
Click OK. (That one was easy!) Before you Save, have you noticed the diamonds at the bottom of each element?

You need to tie each of the elements together! This is very similar to a Visual Process or Flow Chart. Simply click the diamond below the Screen element and drag to the Assignment element. Then click the Assignment element and drag it to the Fast Create element. Last, but not least, you need to tell the Flow where to start. Hoover over the Screen element and click the green circle with a white down arrow, this is the starting icon.

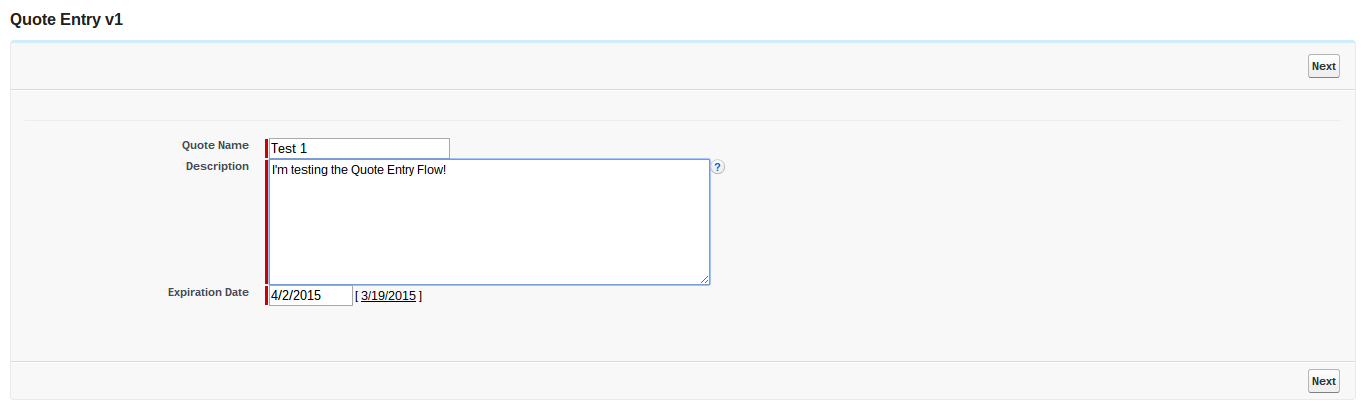
Great! Now click Save. No warnings this time! Time to test. Click Run. Since you haven’t sent the Opportunity Id to the Flow from a button or something else, you’ll need to send it in the URL. Simply go to the URL bar and after the information already there enter ?vOID= and then an Opportunity Id from a test Opportunity. It should look something like this, “https://na16.salesforce.com/flow/Quote_Entry/301j0000000HF3W?vOId=006j000000APyJh“. If you’re not familiar with the ? in the URL, it is telling the Flow to start assigning variables. In this case, variable vOId (yes, capitalization matters) should equal 006j000000APyJh. If you wanted to assign other variables, you would start using the & symbol now and then the variable name, equals, and the variable value. Ok, once you have your new URL with the ?vOId={!Opportunity.Id}, click enter and go to that URL. Enter in a Quote Name, Description, and Expiration Date. You’ll also notice the ? circle to the left of Description, that’s the Help Text you entered in earlier. (If you’d like to see the Validation on Expiration Date, pick a date before Today or after 2 weeks from today)
Click Next. Did it work?! Well, you shouldn’t have seen a cryptic Salesforce Error Screen, so that is good. To check, go to the Opportunity of the Id that you used in your URL. If you don’t see the Quote Related List, make sure to add it to your Page Layout. Go down to the Quote Related List and check. If it’s there, congratulations, it worked! You’ll notice the Expiration Date is set, the Quote name says whatever you put, the Status is Draft, and the Description has been entered in. Great job!!! You’ve successfully created a Flow to have a User step through the Quote creation process. This was a very basic process, so over the course of the next few posts, you’ll learn how to take this simple Quote Entry Flow and turn it into something much bigger that follows new business rules! Before you leave, make sure to Activate your Flow! Click the Close button (double check you saved it before!) and then click Activate (in the picture below, Activate was already clicked, so now it says Deactivate) next to the Quote Entry v1 line!


Awesome! Thanks for sharing.
LikeLike
Thanks Harish, I’m glad you liked the post!
LikeLike
Pingback: Find Related Records and Have Users Select Them in a Screen – Learning Flow 1.B | Developing Flow
Pingback: Require Fields on Other Objects to be Filled Out in Order to Create a Record (Quote) – Learning Flow 1.C | Developing Flow
Hi Rich. I followed your instructions carefully and doubled checked. My button is not updating the Stage field. I click it, the screen flashes and no update. Can you think of something I missed.
-jim
LikeLike
Rich, thanks for a great tutorial..
I have used your sample as a guide to create a “New Quote” flow in our org, but have the following questions:
– Here is my post on SF Answers: https://success.salesforce.com/answers?id=9063A000000iRDrQAM
– Can you help me get past this? thanks
LikeLike
Hi Jerry,
Regarding your first question, are people changing the account/parent/owner when creating a quote? If not, is there a reason you are displaying those values?
LikeLike
For the second question, you need to make sure to assign the dynamic picklist choice to the quote contact in the assignment.
LikeLike
If you do need to display the values in the screen, I suggest creating variables and sending the name values in through the URL so that you can use it in a display element. No need to make it a changeable field since the user is creating a quote to that opportunity and shouldn’t be changing that info. If you don’t want to use variables, then you’ll need to do lookups on the Account, Owner, and add Opportunity name to the opportunity lookup in order to get the names. Again, I would use a display field and not an input field. You can still do the assignment to the quote in assignment based on the opportunity lookup information for account Id, owner Id, and opportunity Id.
LikeLike
Thanks for the reply.
– You are correct in that those values for account/parent/owner are not changed when creating a quote. – I was just needing them displayed to make the flow more friendly to the end-user.
I have yet to find a flow tutorial that displays a friendly “header” of the actual record the user is working on (or other relevant info that might be needed to view only).
– Minimally, our users would like to display the Opportunity Name & Account Name in a bold font at the top of every flow page… maybe like this:
“Follow the wizard to create your new Quote for XYZ Company (XYZ Company – 1Gb Point to Point)”
LikeLike
Hi Jerry,
I write about how to do it in this post. https://developingflow.com/2015/04/02/error-learn-how-to-work-with-flow-faults-learning-flow-1-d/ Go to the paragraph that starts with, “Create a new Screen, Name Flow Error Screen, Unique Name Flow_Error_Screen”. There is a flow element called Display Text that allows you to write what you want and use variables to show data to users. Hopefully that section helps you out with this!
LikeLike
Thank you SO MUCH! I am trying to wrap my head around sObject, Fast Create etc., It has been a challenge, to say the least. Your blog worked like a charm. It helped me get comfortable with the concepts and gave me confidence to take next step! Thank you!
LikeLike
I am getting the error when i try to do this.
An unhandled fault has occurred in this flow
An unhandled fault has occurred while processing the flow. Please contact your system administrator for more information.
Any idea how to fix it. I am doing everything accordingly.
LikeLike
Hi Darko,
You should have received an email with the error information. Do you see that?
LikeLike
Hi Rich,
I can’t find your email. I only received a notification that you wrote this comment. Under what email should i search ?
Thanks
LikeLike
Hi Darko,
It would have come from Salesforce at the time of the error. Check out my post on handling errors to see if that helps you troubleshoot. https://developingflow.com/2015/04/02/error-learn-how-to-work-with-flow-faults-learning-flow-1-d/
Rich
LikeLike
Error element fcQuote (FlowRecordCreate).
This error occurred when the flow tried to create records: REQUIRED_FIELD_MISSING: Required fields are missing: [OpportunityId]
LikeLike
Hi Darko,
It seems you are not mapping the opportunity id to the quote sobject, it’s trying to create the quote without an opportunity id.
LikeLike
Hi
Thanks for the tutorial.
For new users, I would recommend:
(a) Embedding the flow on the page layout and then checking “pass Record ID”
(b) Instead of adding “?={!Opportunity.id}” instead just click debug instead of run when testing and enter the Opp ID…otherwise for me, I received an unhandled error!
Keep them coming!
LikeLike
Thanks AG 3142! That is an option, however that will run every time a user goes to the page. If you aren’t trying to run the flow every time your user goes to the record, a button doesn’t require them to have the flow start every time.
LikeLike