Welcome to my first post! This post will be a great start to learning Salesforce Visual Workflow, also known as Flows, where we will be able to create a button that when pressed, will update the Salesforce record. This question was asked in the Orange County User Group. #ForTheCommunity
Hey,
Does anybody know the exact parameter in regards to saving a record automatically using a custom button? I’m trying to execute it by using Save=x & Save=1 but it just hasn’t done the magic yet. Please assist. Appreciate it.
Thanks in advance,
There was a way using URL hacks that you were able to create a link, have it update the record, and save. For some, that is not available anymore… But don’t worry, Flows to the rescue! I asked for just a little bit of clarification, so now we have our goal.
Well it’s a custom button that automatically updates the stage to become Closed Lost but I don’t want a new window to pop up. Once a user clicks on the custom button, I want the record to be saved automatically.
Ok, so we are going to have a custom button that when clicked will update the Stage to Closed Lost (on the Opportunity) without a new window popping up. Let’s start by building our Flow. If you’ve never built a flow before, start by going to setup and searching for Flows in the setup search. Remember, start by testing in a Dev org or Sandbox!
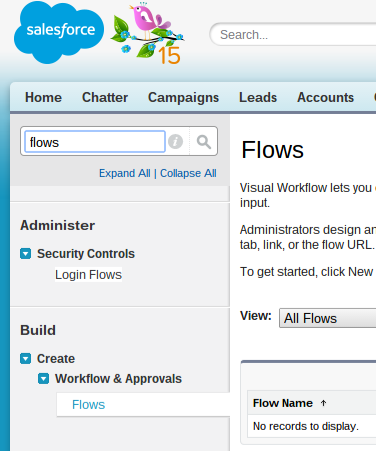
After getting to the Flow page, click the New Flow button. That will bring you to the initial Flow starting page. There are some videos that Salesforce has put together to teach you about Flows. If you’re new to Salesforce Flows, it would be a great start. When you’re done watching the videos, click close. On the left side you’ll see the Flow Palette.

If you click the arrow next to description, you’ll see more of the Palette.
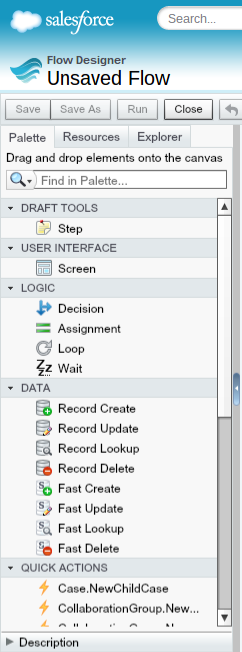
As a quick overview if you’re not familiar with Flows, Screens are used for Users to interact with the Flow, allowing you as the Flow creator to build a wizard for Users to click through. We’ll work on building a wizard in a later post. The Logic section allows us to have Decisions, things like, if Quantity is <5, then go this way, if Quantity is between 5 and 10, go this way, or if Quantity is greater than 10, go the final way. Assignment is how you assign values to different records. Loop will allow you to loop through multiple records and do some action on them. Wait allows you to delay the actions following.
The data section is the section that we’ll start with. When it starts with Fast, it allows us to hold an sCollection, essentially, if you’re looking up an Opportunity, it uses one sObject Variable, we’ll call it sovOpportunity, and you can call different parts of the Opportunity by using sovOpportunity then “.”. For instance, StageName is sovOpportunity.StageName. Data elements that start with Record, you’re updating specific variables that you select in the process. For instance, if you had a variable for StageName called vStageName, then you would assign the value of the record you’re querying (looking up) to the vStageName variable. In fact, this is what we are going to do. So let’s jump in!
Start off by clicking the Record Update element and dragging it to the big blank area to the right of the palette. You’ll come to the Record Update screen. Let’s Name this ruOpportunity (for record update, Opportunity) and click tab. The Unique Name should automatically be entered for you. In the next field, Update, select Opportunity. To recap, you should see this so far.

In field, select “Id”, for Operator select “Equals”, and for Value, click the drop down arrow and select the arrow for Create New, then select Variable. Enter the Variable Name as vOId for Variable Opportunity Id and enter that into the description. Leave the Data Type as Text, select Input/Ouput Type as Input and Output, and leave Default Value as blank and click ok. It should look like this.

From there, in the Field section, select StageName and then for the Value section, select the value from Picklist, in this case, we select Closed Lost. Your Record Update should look like this.

From here, click ok. Then, hover your mouse over the Record Update element and click the down arrow that says Set as Start Element when you hover over it.

Now click Save in the upper left and name your Flow, in this case, let’s call it ClosedLostUpdate. Hit tab and let the system auto-fill the rest of the information. Just click ok to finish saving. You’re going to get a notice that says:
“General Warnings (1) These issues don’t prevent activation, but they may cause problems at runtime.
· ruOpportunity (Record Update): “ruOpportunity” is not connected to anything.”
Don’t worry, just click ok! Our flow is that simple to start. Then click Close and when you get back to the Flow setup page, click Activate. Grab the URL(/flow/ClosedLostUpdate) from the flow setup page, we need this to create our button!

From here, we are using standard Salesforce Admin functionality. Let’s go to Setup>Customize>Opportunities>Buttons, Links, and Actions. Select New Button or Link. Enter something in the label that is User friendly, like, Close Lost, and have the system fill out the Name. Select the Detail Page Button as the Display Type, then select “Display in existing window without sidebar or header” (the requirement was without popping up a new window) in the Behavior area. Content source we should leave as URL. In the link editor section, enter “/flow/ClosedLostUpdate?vOId={!Opportunity.Id}&retURL={!Opportunity.Id}” without the quotes. Click check syntax to double check it works. If you’re not familiar with Salesforce URLs, we are going to launch the flow, ClosedLostUpdate, we are setting the Variable vOId as the Opportunity Id, and we are saying upon return, send us back to the Opportunity. Click Save and you’ll see Salesforce’s reminder to add this to a page layout. Ok, head to Page Layouts, add the button to your Page Layout, and click Save. When it’s all said and done, you should see the button, Close Lost, in the section where you added the button to your Page Layout.
Let’s test it! Click your Close Lost button on an Opportunity that is not currently Closed Lost! Voila!!! You’ve given your Users a one click button! You can now give them one click buttons to update something specifically on any field or fields in an opportunity by selecting them in the record update. Congrats on creating your first Salesforce Flow!

Pingback: Create an Input Screen for Users, Assign Variables, and Create a Quote – Learning Flow 1.A | Developing Flow
Brilliant Rich,
You couldn’t have made this tutorial FLOW smoother. Simple language yet comprehensive enough to cover all steps.
thanks
LikeLike
Thanks Mubashir, I’m glad it is helpful and easy to understand!
LikeLike
Cool feature using custom buttons to start a flow. I always missed this feature for standard worfklow rules.
LikeLike
Hi Rich. I followed your instructions carefully and doubled checked. My button is not updating the Stage field. I click it, the screen flashes and no update. Can you think of something I missed.
-jim
( i left originally post in the wrong area)
LikeLike
Hi Jim,
There are a few things that could cause this. Do you have any other workflow rules that could be causing the stage to change back? Are you getting any sort of error screen? Do you have a validation rule or Apex running on the stage field as well? I would suggest to turn on debugging for your user and run the Flow, then go back and check the debug log. Let me know what it says, hopefully we can diagnose it!
Rich
LikeLike
Rich,
Could you help me with this? I’m trying to allow users to update the same field on multiple campaign members.
What do I need to do to make the following flow to update a field on several member records with user input? To allow users to add commentary to multiple campaign members at once, I’d like to do the following, starting by clicking a button on a campaign page. Please let me know where I’m doing something wrong. Thanks.
(1) Screen: Show multi-select checkboxes of a dynamic record choice based on campaign members that meet certain criteria.
(2) Fast Lookup: Lookup all campaign members that were selected. (Do I save in an sobject variable? Or an sobject collection variable?)
(3) Screen: Display the name of each campaign member from (2) along with the existing notes, along with a text box to allow user entry. (How do I get the pattern Campaign Member, Campaign Member Field, Text Box and then get it to repeat?)
(4) Assignment: Change the sobject variable or collection from (2) by appending the user entry from (3).
(5) Fast update all records from the newly assigned variable.
(6) Show an error message if someone else updates at the same time
Say thank you.
LikeLike
Hi Rich,
I have followed all the instructions provided by you.But my button is not updating the Stage field.I dont have any workflows or validation rules or flows on opportunity object.When i click the button it is refreshing but no change in the record.
stage original value is “Prospecting”
expected value “closed lost”
but the
result value is “Prospecting”
LikeLike
Hey Rich,
Just sharing some troubleshooting success. I tried the method you went through, wonderful, amazing, didn’t work for me for some reason. I found an error message when saving the original setup, basically saying that I cannot update the stagename field with the value of ‘Closed Won’ – a selection in the piclist I was intending on using.
Instead of drowning in the mystery and figuring out debugger or if it’d help, I just made a slight adjustment. In the record update configuration window, in the last step where we establish the stagename value to update to, I used a constant instead of the actual picklist value. I made the value of that constant the same exact value as the stagename I was wanting ‘Closed Won’. This was done under the +CreateNew menu in the drop down for the value. (Pics below)
Just posting so you I can share the learning love, as you’ve shared with all of us. Many thanks for your article as I’d never had gotten this far without it. Just now discovering flows so we’ll see where I end up 🙂
I wasn’t sure how I could post an image but here’s imgur links to screen shots of the adjustment – I also named the ID variable different, as a note to the adjustments overall.
Record Update Config: http://imgur.com/a/5rvWH
Constant Setup Select: http://imgur.com/a/oB1VP
Constant Config: http://imgur.com/a/R90Vv (red border because this is a remake just to take the snapshot)
Hope this helps, thanks again Rich!
LikeLike
Hi Steven,
Thanks for the feedback, I’m glad that the constant worked!
Rich
LikeLike
Hey Rich,
I need to update multiple lead records from list view without moving to another screen. Need to update selected records owner field as current logged in user directly. Can you suggest me whether its possible in flow and provide me the steps
LikeLike